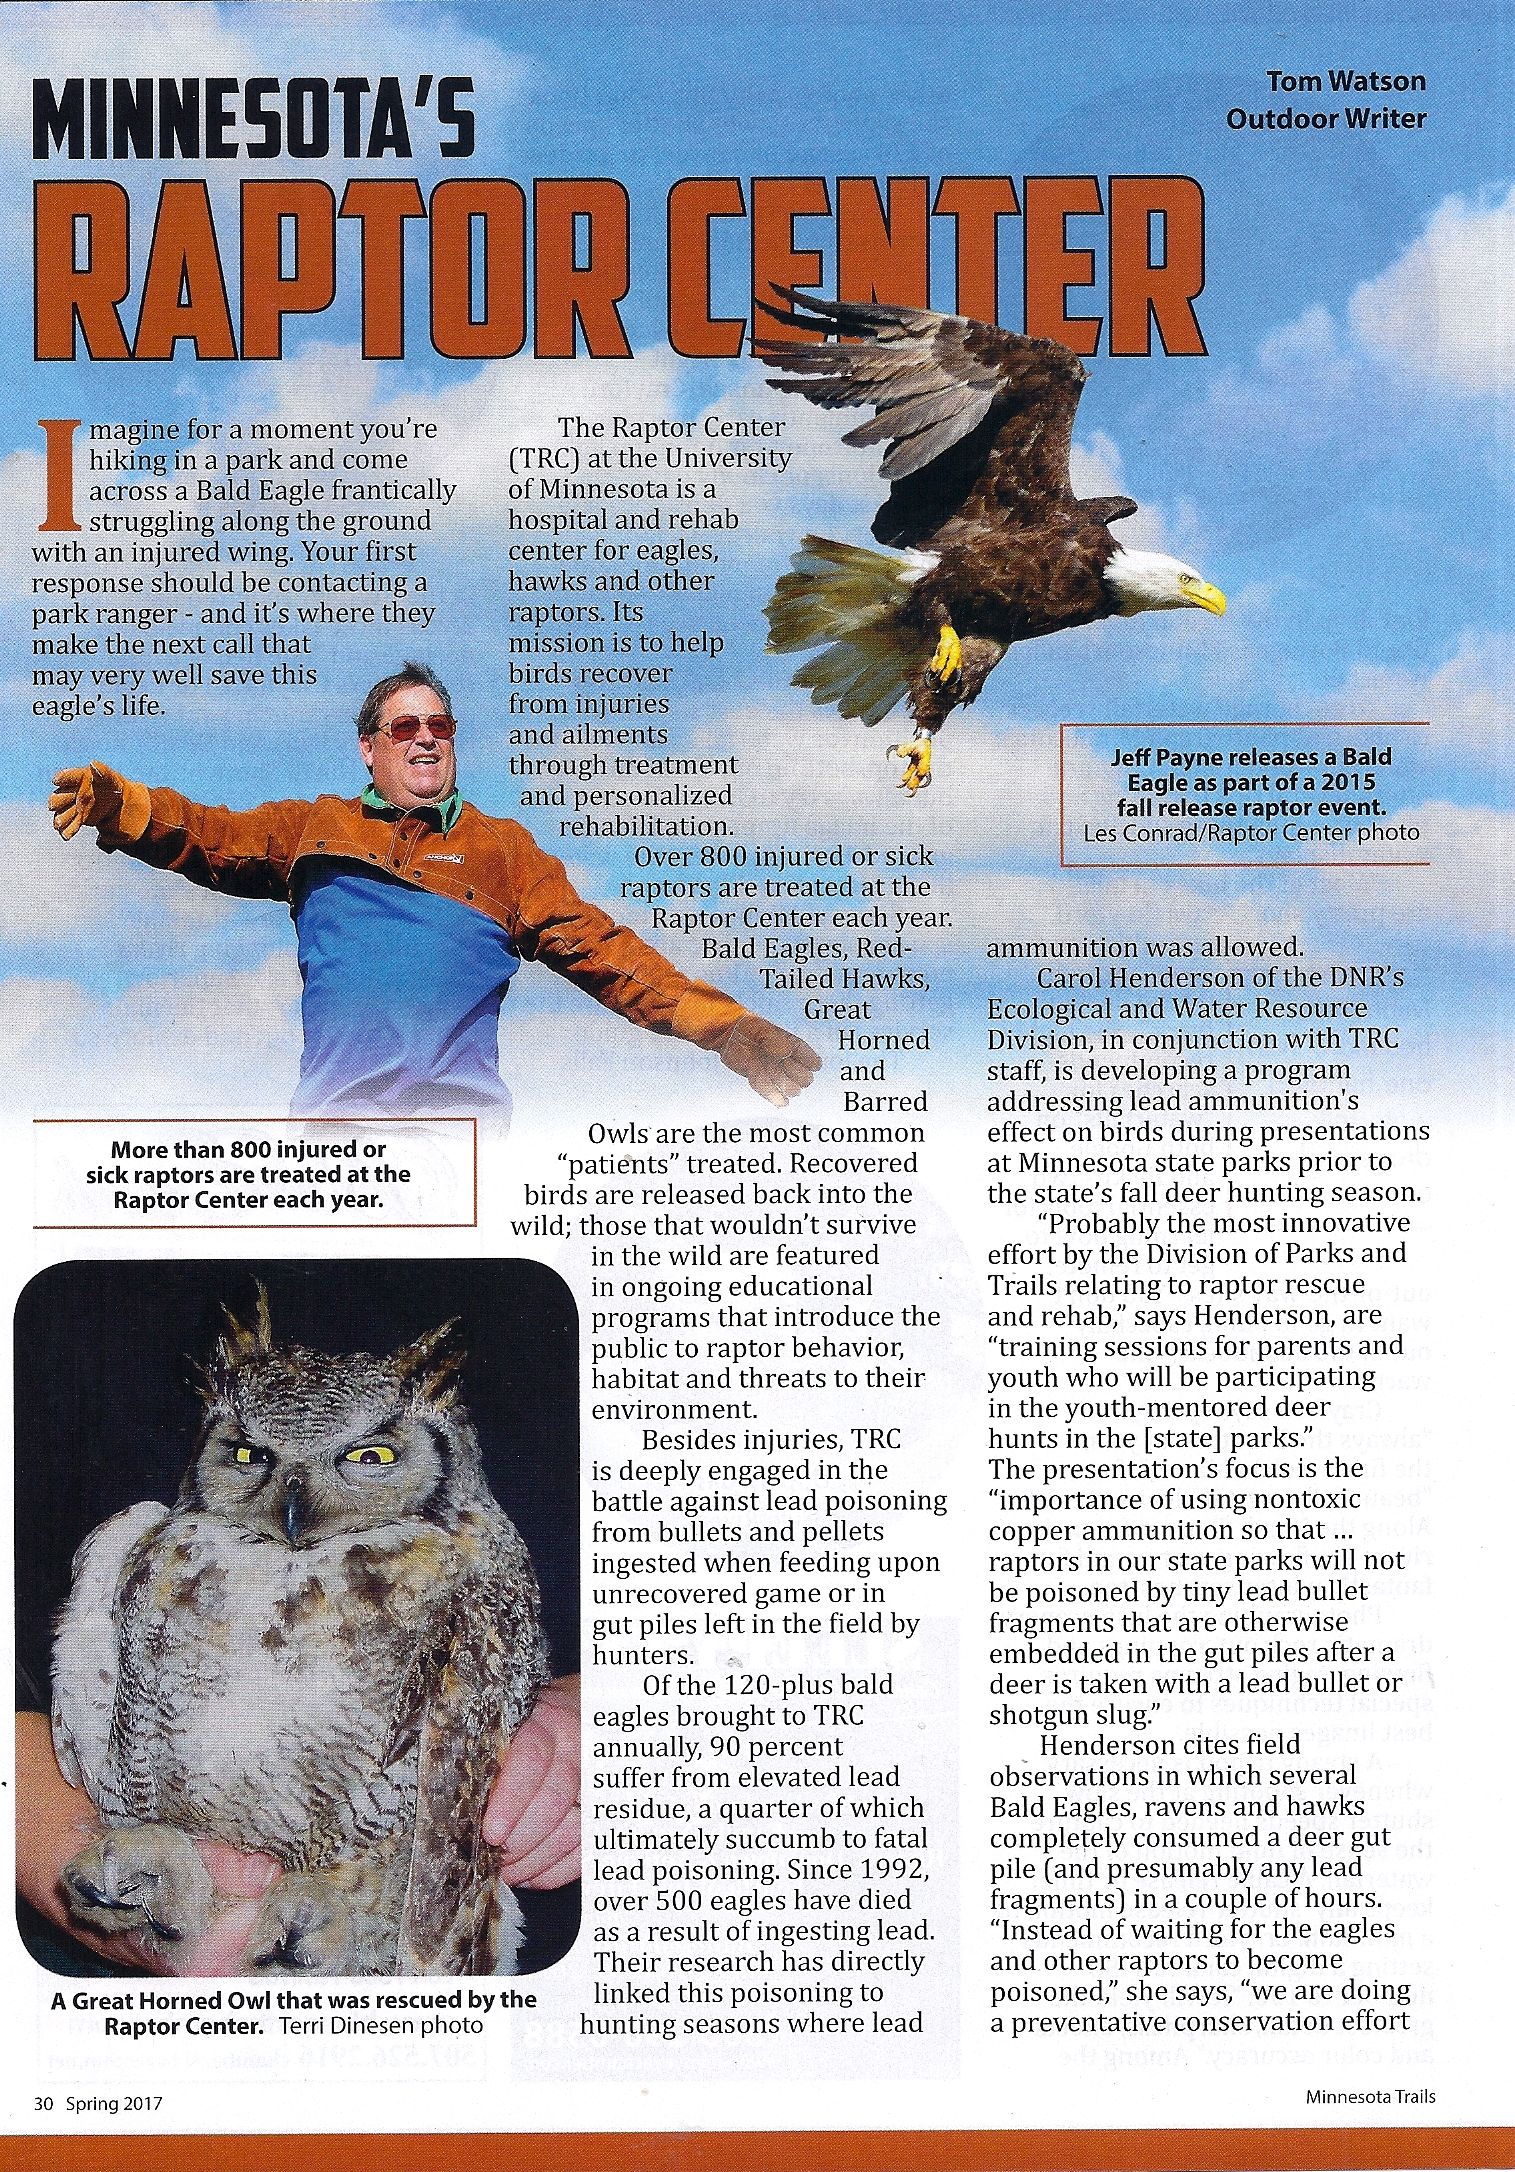
Minnesota Trails Magazine – Winter 2018-19
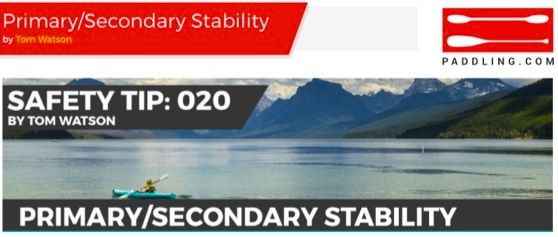
The “stability” of a kayak refers to two distinct and inter-related aspects of how steady/stable the kayak ‘feels’: 1) when initially at rest on flat water – it’s primary stability; and 2) how stable it is when up on edge/leaned to its side (usually in rougher seas) to a point up to its capsize threshold – it’s secondary stability. This can be deceiving for beginners who presume the initial security of a boat with good primary stability is the more stable kayak.
In actuality, a boat that is initially “tippy” is the better choice for rougher sea conditions. A forward-thinking beginner who is serious about becoming proficient at kayaking should consider a boat with better secondary stability and grow into that more responsive boat. Initially stable boats are best suited for protected inner waters and activities such as kayak fishing.
Cross-sectional hull design offers insights into a boat’s inherent stability. Four basic shapes/configurations suggest how a boat will react on the water:
Flat bottom – very stable, typically wide boats used for casual, recreational use on small bodies of calm water; ride “on top of the water”;
Round bottom – displacement hulls with more secondary stability, typically faster hulls, can be leaned into swells, waves for better control and stability;
V-bottom – good tracking, better secondary stability; most often combined with rounded hull to give kayaks their classic cross-sectional profile;
Pontoon/Catamaran – Very stable, slower, with some secondary stability characteristics, most common shape for SOT, fishing and other recreational “kayaks”.
Some hulls feature a notable “chine”, the distinctive hull edge on the border between the bottom and the sides. A hard chine helps the paddler ‘edge’ the kayak on a lean for better control and turning.
A dealer’s “demo” event is a great, instructive opportunity to compare the stability of different kayak hulls.

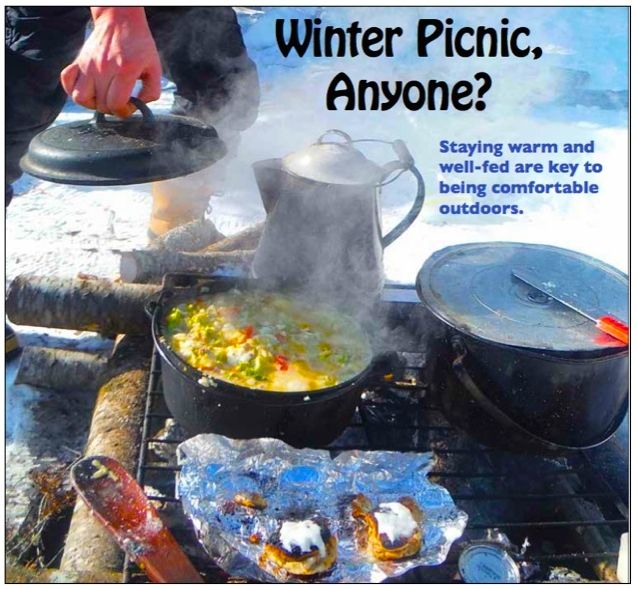
Cloaked in the fragrant essence of basil, the steam swirled and danced in the cold, wintry air as I drew a spoonful of tomato-saucy spaghetti to my lips. Another night dining under crispy cold skies and the campfire cuisine was as fulfilling and satisfying as ever!
Whether it’s a soothing pot of hot soup during a day of cross-country skiing, or a spoon-coating, chunky rib-sticking bowl of beef stew during an extended outing, cold weather campfire cooking is a critical, yet creative highlight of most any winter camping experience.
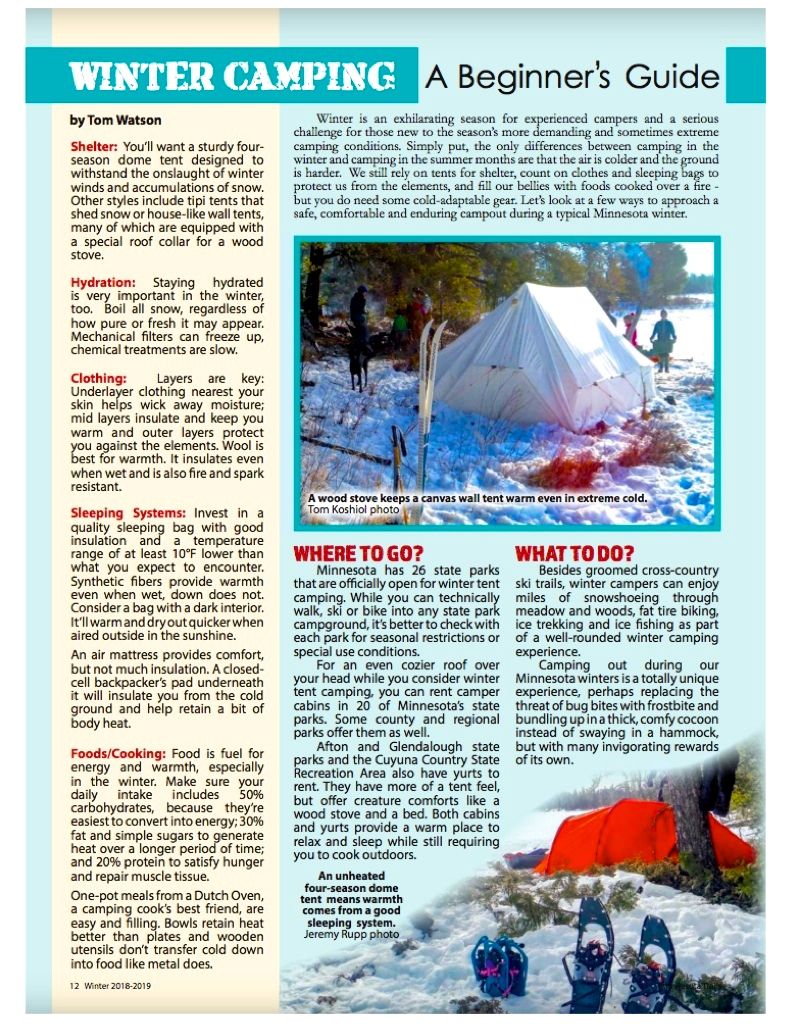
Mastering a cuisine where your “stove” is a wire grate over glowing coals can be a challenge all its own. When your extensive arsenal of lightweight pots and pans is replaced with a huge, clunky, cast iron bucket, and all your hot water comes from melted snow in a pot that looks like a throwback to a chuck wagon on a cattle drive – that’s when outdoor kitchen cooking skills truly rise to the occasion.
Playing or working outdoors in the winter are demanding activities, requiring lots of fuel – in the form of calories – to keep going. One person’s relaxing “roughing it” in the camp kitchen can be another’s anxiety-raging survival scenario. Knowing a few fundamentals about both the foods you should consider for cold weather dining, and how to prepare and serve warmth-sustaining, high-energy meals are key to enjoying a bountiful and satisfying fireside cuisine. Paring nutrition with carb loading and other energy-boosting foods as part of your outdoor cooking menu is a critical, but relatively easy and tasty meal preparation task even around the campfire.
Depending upon the type and level of activities you pursue throughout your winter day, you can easily use up 3,000 or more calories. Contributing factors include the temperature, your physical stature, your body’s metabolism and other factors. That roughly translates to consuming over two pounds of food/fuel per person, per day. And that’s not by just stuffing your face with energy bars all day, either. Rather it’s balancing out your diet among these basic nutrient groups: carbohydrates, fats and proteins.
About half your active winter caloric intake should be carbs in the form of starches and sugars. Quick energy can come from candy bars or sweet fruit drinks. Complex carbs such as grains and pastas work, too, but take a bit longer to release energy because they take longer to metabolize.
Fats from oils, nuts, cheese and some meats should be the source of about 30% of your calorie intact. There are twice as many calories per pound of fat as there are in either carbs or proteins.
Building or repairing body cells and tissue is the job of proteins best used in the outdoor menu as meat products – mostly pre-cooked like sausages and jerky that are already to eat on the trail.
In addition to these groups, consider bringing an assortment of spices and herbs, either individually or pre-mixed such as garlic-salt, basil-oregano pouches and other tasty medleys of flavor enhancers.
Coupled with these nutrients is perhaps the most important consumable you should depend upon outdoors – water! Hydration is equally important in winter. Eating triggers metabolism and that requires water. Know the signs of dehydration and drink at least 2-4 quarts a day – drinking periodically before you feel thirsty.
The most efficient way to preparing and cooking most any meal outdoors is to just toss everything into one big pot! It’s quick, easy and satisfying. Variations of soup and stew recipes are ideally suited for preparing or re-heating in one big pot over either a stove or open coals of a campfire.
The key is “one-pot meals” and a Dutch oven fills this bill perfectly. These stout vessels are available in a variety of sizes providing the ideal cooking cauldron for solo meals or group feasts. Several ovens on a large grate can match any multi-burner stove top for effectively heating/cooking meals.
Some campers prefer to pre-cook foods and freeze or otherwise store them in zip-seal boiling bags. This shortens prep time in the camp kitchen and also expands the choices of entrees – and desserts – you can bring to the field. While one-pot meals means you are limited to the vessels available for preparing sauces and gravies or even veggies separately, consider adding those food items, packaged in a boiling bag, to the boiling water in which you are already cooking the pasta. The bag contents heat as the noodles cook and are both hot and ready to combine at the same time.
That’s another key to outdoor cooking – making sure everything is cooked and ready together. Heat and time sensitive foods may not be the best choice for cooking over a limitedly controllable heat source such as flames or coals from a campfire. Timing the adding of ingredients to a large pot can affect the intensity of flavors shared during that cooking process.
If you prefer using a camp stove for your cooking heat, make sure it’s cold weather worthy and uses liquid fuel. On extremely, exposed-to-the-cold days, fuel bottles may need to be insulated against lower temperatures. Use some form of secure, flat insulation between the bottom of the stove and a snowy base.
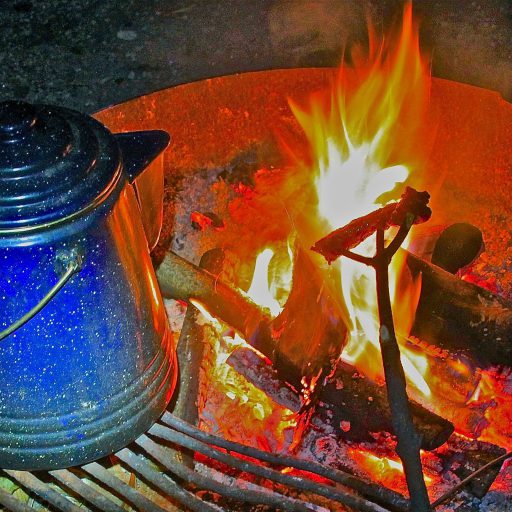
Two absolutely essential “utensils” always in my camp kitchen are a huge, 2-gallon blue enamel coffee pot – always on the edge of the fire, always a source of hot water. Adding snow to the hot liquid keeps it’s water level up throughout the day.
The second critical piece of kitchen gear may sound a bit eccentric, but it’s worth has been proven through its use on myriad tasks – a flying disc (aka “Frisbee”!). It’s tough plastic, curved plate-like body with a significant raised edge makes it suitable for many culinary tasks: cutting/slicing/dicing/mincing board; base or wind guard for camp stove, and an especially stable and spin-resistant “plate” for meals, especially saucy ones! I’ve come up with at least 12 uses for my all-purpose camping disc – and kitchen use ranks at the top.

Other winter cooking tips that will make your dinning experience more comfortable include:
- Use wooden or plastic utensils to prepare/eat food; metal draws cold down into foods;
- Use bowls as much as possible, the food stays warmer than if on a plate;
- Some dry soup mixes contain uncooked beans, etc….needing long preparation times and expenditures of fuel to cook;
- Dry mixes can add flavors to any meal, even when just sprinkled into the pot; same, too, for flavored fruit drinks;
- pre-cut foods if possible – saves time and limits your bare hands to exposure while prepping the food;
- Use lids on everything, especially cooking pots – keeps the heat in, reduces cooking time;
- Potato flakes make a great ‘extender’ in sauces and thickener for soups.
Staying warm and well-fed are two key factors in being comfortable outdoors. That’s why a good camp kitchen, providing hardy, rib-sticking meals is such an important – and easily accomplished – part of enjoying a wintry wonderland.

Taking Stock of Everything – Survival Inventory
A critical reason for keeping a clear head in an outdoor emergency, maintaining that Positive Mental Attitude (PMA), is to be able to think on your feet – and to be able to “see” into the future. What part of your bad situation right now could get even worse? Taking a mental inventory of those issues is one of the earliest steps in a survival situation. Once you’ve accepted the fact that you are up that proverbial – and infamous – creek without a paddle, you need to assess what you do have.
Your very first priority assessments may have to happen quickly, simultaneously. Depending on the nature of your emergency – it’s usually critical to immediately get out of harm’s way. Your very first ‘inventory’ thus becomes being aware of any potential dangers that could still causea threat to your safety.
Backcountry first aid response begins with an inventory of all injuries and administering the appropriate, prioritized treatments quickly. Assess yourself for injuries first, then others in your party. Each victim should be examined for their degree of consciousness, checked for breathing, any bleeding and any disability concerns. The mechanics of injury can help determine what first-aid measures must be taken.
Once you’ve stabilized your situation, even if temporarily in the immediate surrounding environment, you can assess the location to determine whether you can establish a rescue base there or do you need to find a better location elsewhere. Part of your inventory process will be to find an optimum physical location. Factors such as weather, terrain, remoteness and resources will all play into determining where your best emergency camp should be located.
You may have to re-assess and adjust several times before your situation begins to stabilize and broadens your options.
Other critical inventory assessments should be initiated soon after immediate personal injuries are treated. Inmany emergency situations your vehicle’s been damaged, your food has been lost, your tent ruined. What’s left or salvageable become the first entries on your hopefully long list of emergency resources.
Taking inventory should be an ongoing process, something you are assessing visually from the onset, making mental notes of everything around you – no matter how absurd you may think an item’s usefulness might be – marking it down on that checklist in your brain!
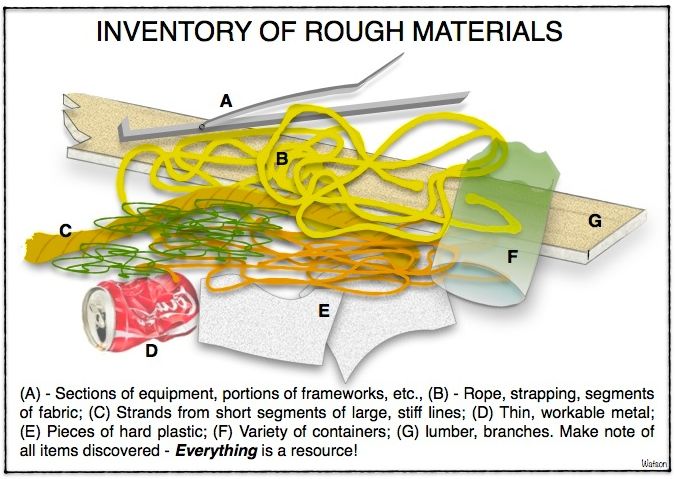 Perhaps you uncover a small section of a large diameter rope; a summer sausage-sized segment so unwieldy that you can’t even tie it in a simple overhand knot. Useless, right? What if you unraveled the individually thinner strands that have been wound to form that massive line and tied those short strands together. Now you are on your way to making workable cordage for lashing a frame for your shelter, fashioning a snare or making fishing line? You don’t need to decide what to do with a discovery, just add it to your list of available resources.
Possessing your own inventory of self-reliance skills will give you a solid base for spring-boarding ideas for using what you find. Fragments of a broken plastic bucket can become a handy scraping/digging tool or, when laid out like shingles or roof tiles, can direct rainwater into a receptacle or perhaps a collecting basin you’ve created by lining a depression with that remnant of a tattered nylon tarp you found? Those flat, broad pieces of bucket can also become a make-shift signal ‘mirror’ as they throw off a glint of sunlight when the surface is wetted.
Some of the more common materials found are those that will help you construct your shelter. Look for natural settings as well, a low-growing branch arching horizontally above the ground can become a crossbeam to support a tarp or a thatch-like roof. Chunks of timbers and other wood scraps are convenient fuel for fires as well as building materials that can take on myriad roles in a survival situation.
There’s no such thing as “junk” in an emergency scenario. A crushed soda can might be reincarnated as shiny flashers for a fishing lure; a sharp edge becoming a cutting tool; a small container for boiling water.
Different parts of the country are going to have stockpiles of emergency resources representative of the lifestyle and culture of that region. Anyone who’s walked a remote beach along one of our continental oceans can attest to the plethora of flotsam and jetsam along its shores – unsightly yes, but a treasure trove of self-reliant resources in an emergency.
Equally vital to your survival, beyond materials for a shelter is knowing what water and food sources are available. Part of your initial recon’ of an area should determine whether or not you’re in an optimum location for short or long-term survival, and if there are any factors that might ultimately worsening the current situation. Scouting the area may tell you that you need to find a better location – one with more resources or less potential hazards.
Every task in an emergency situation taps the body’s energy reserves. You need to pace yourself as you undertake your inventory. Not only should you assess the utility of a resource, but the expenditure of energy needed to get value from it. If it takes more energy to gather and create a snare trap than it will from the food you hope to catch, perhaps an alternate means of getting dinner should be considered.
In an emergency inventory, everything is mentally tagged, everything is important. Identifying what resources you have to work with, and having the skills to get as much utility from those materials as possible, are critical to being self-reliant in the outdoors.
MINNESOTA TRAILS Magazine – Summer, 2017
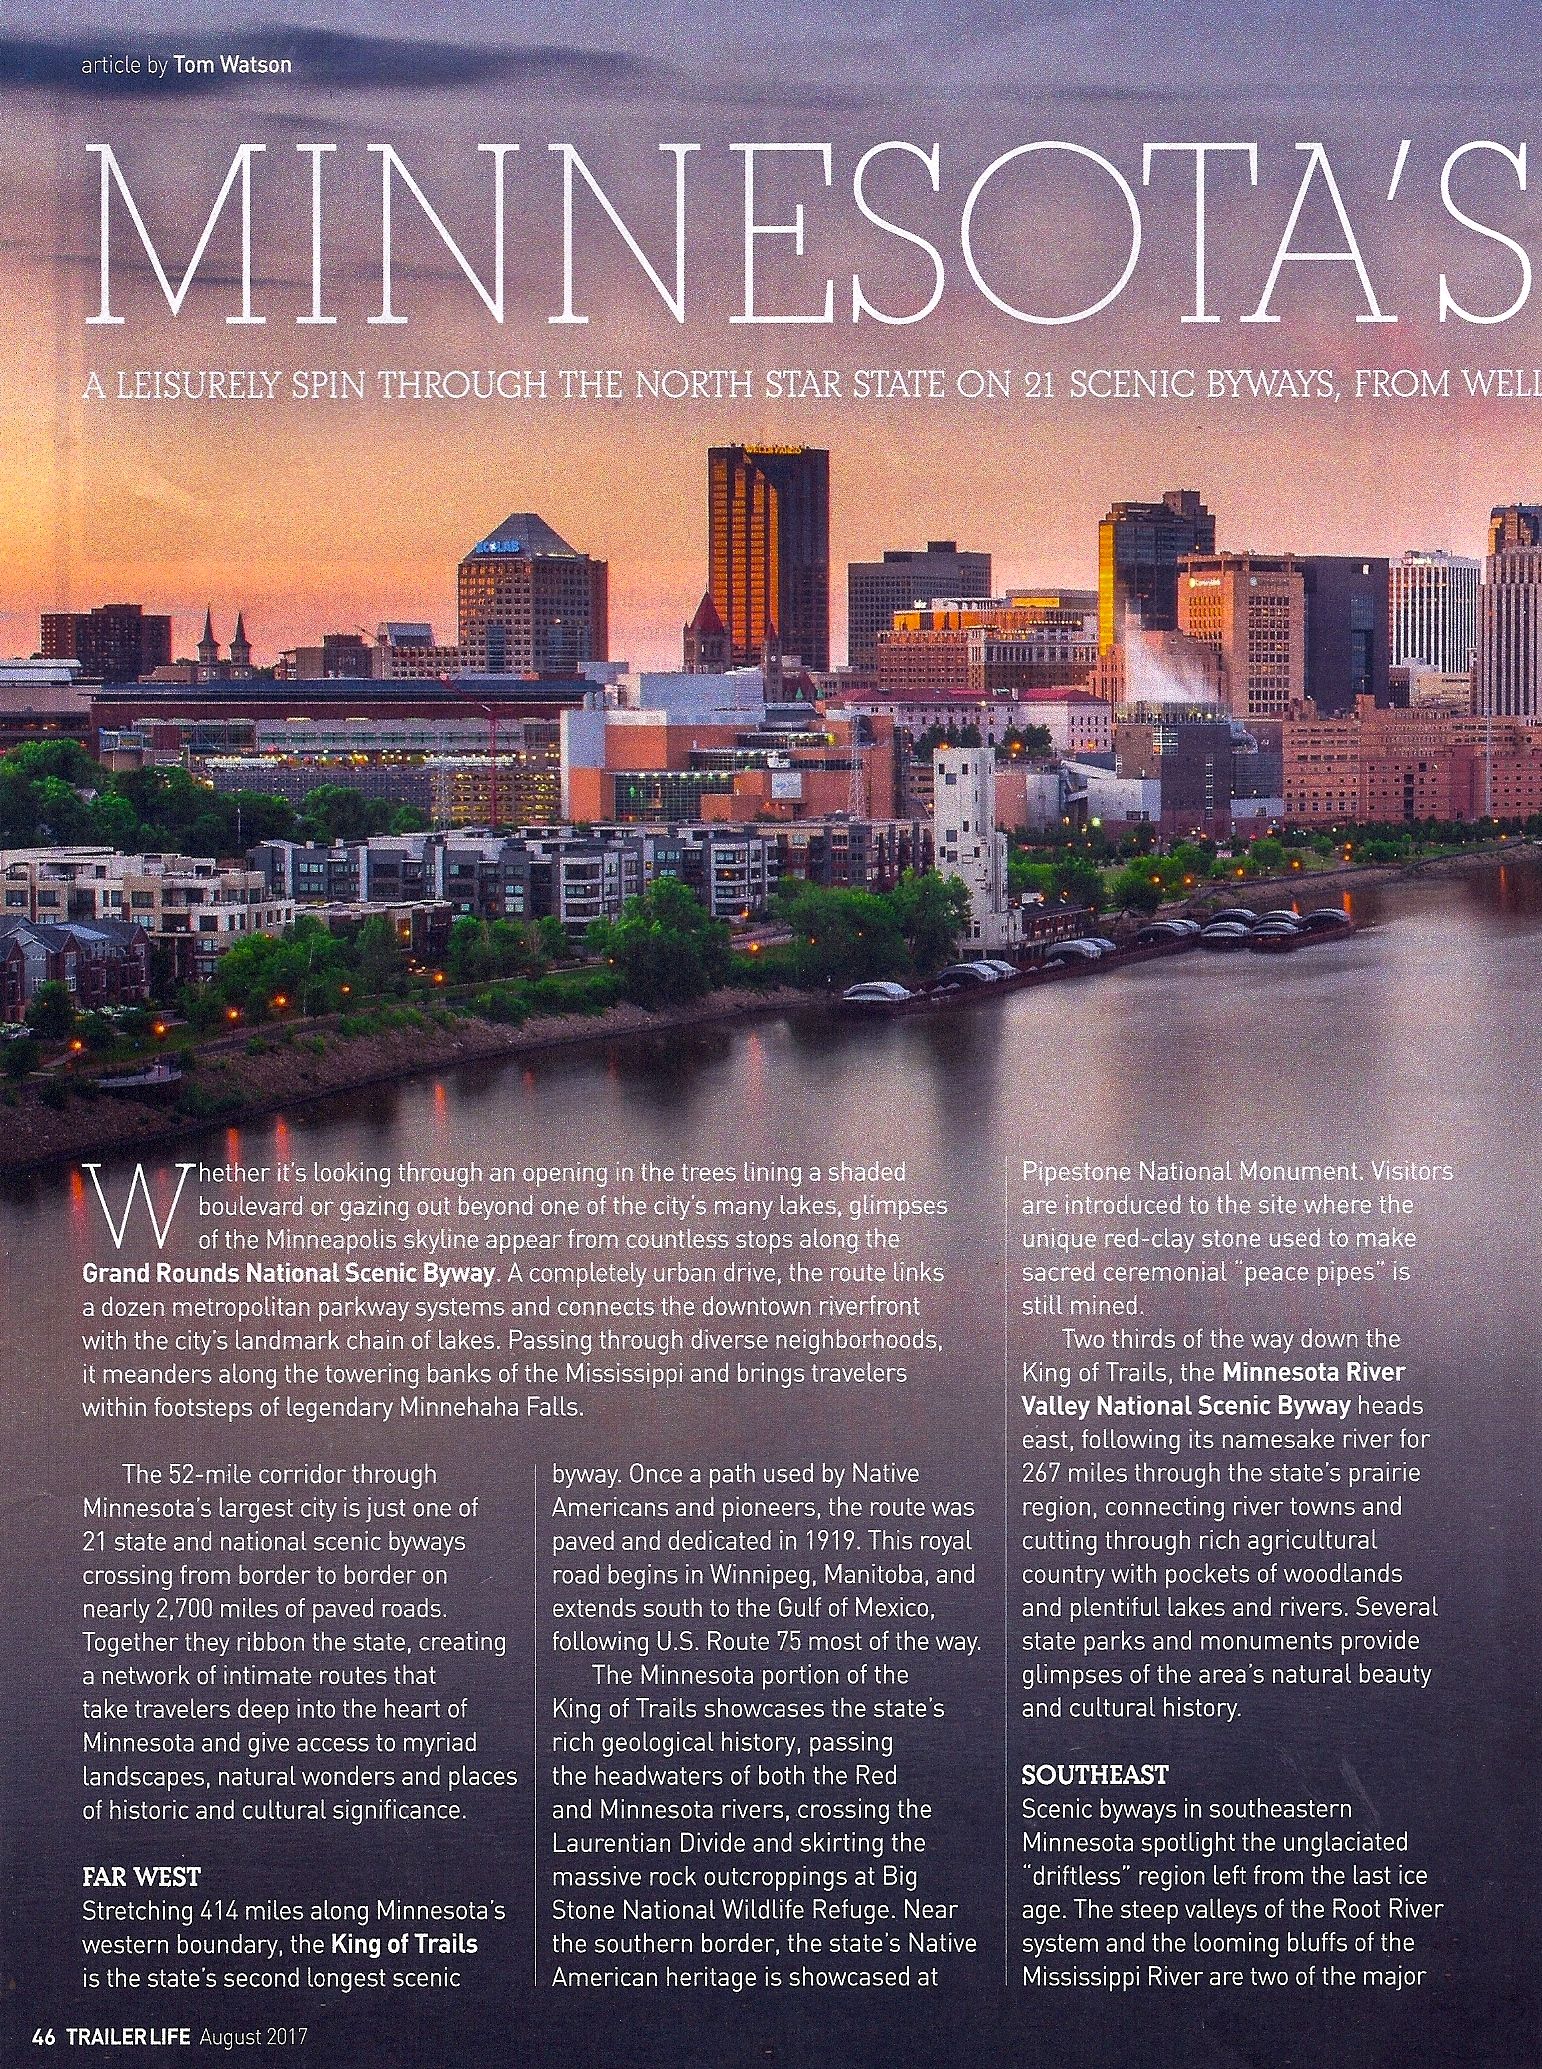
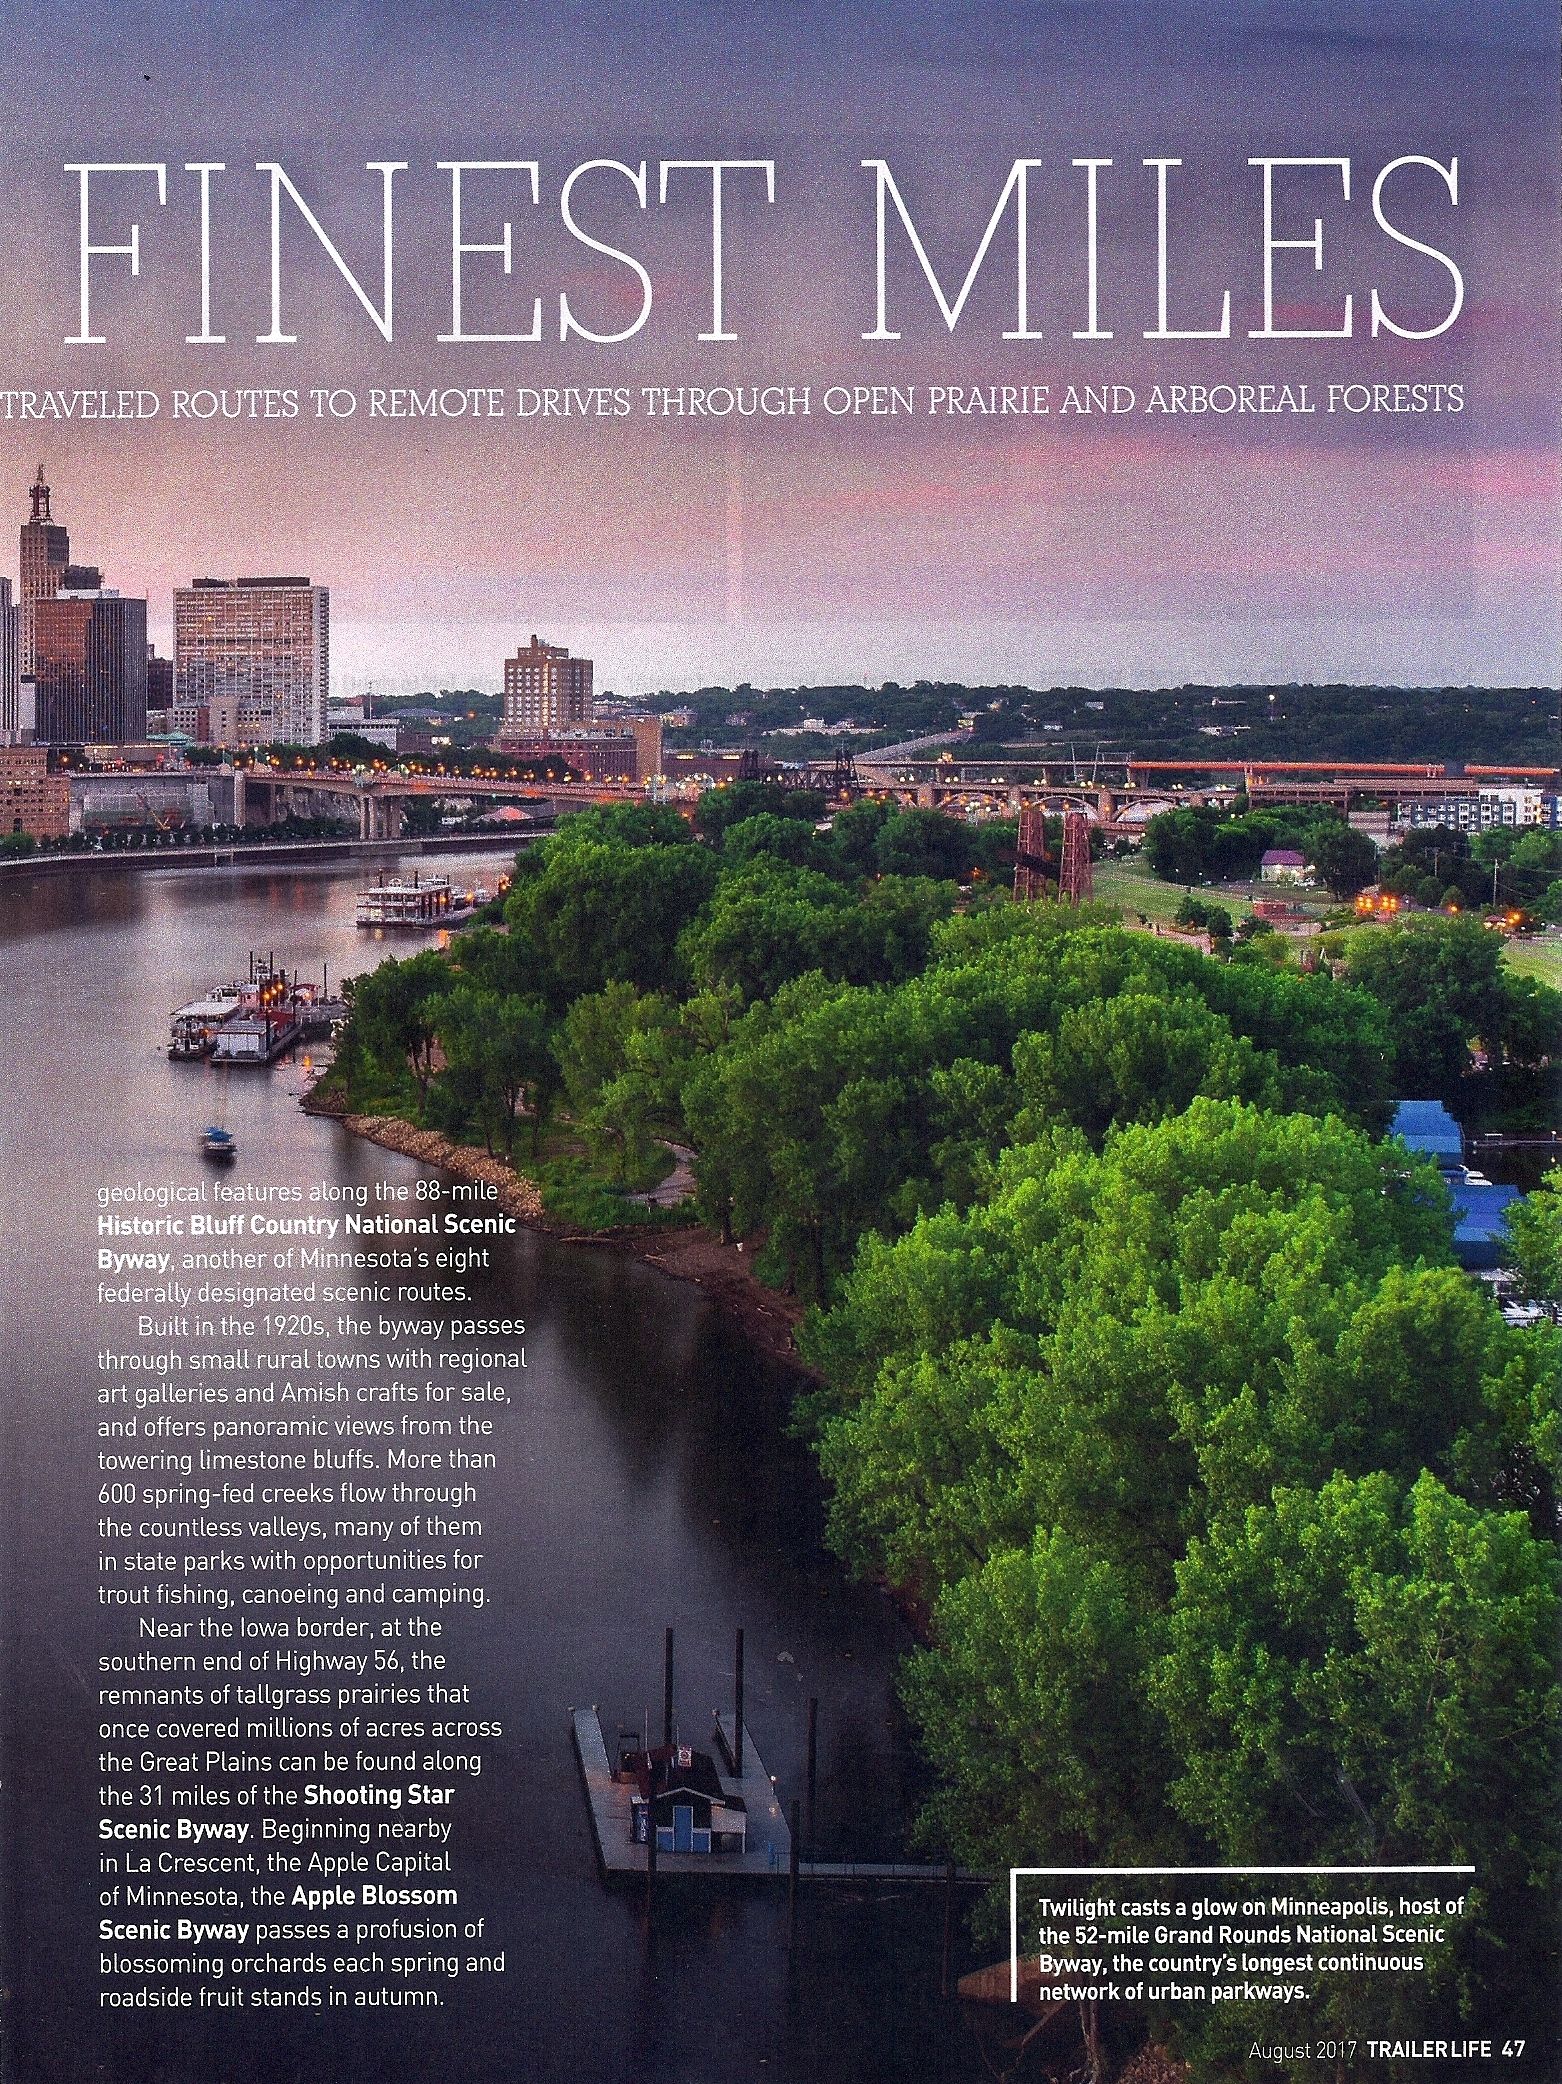
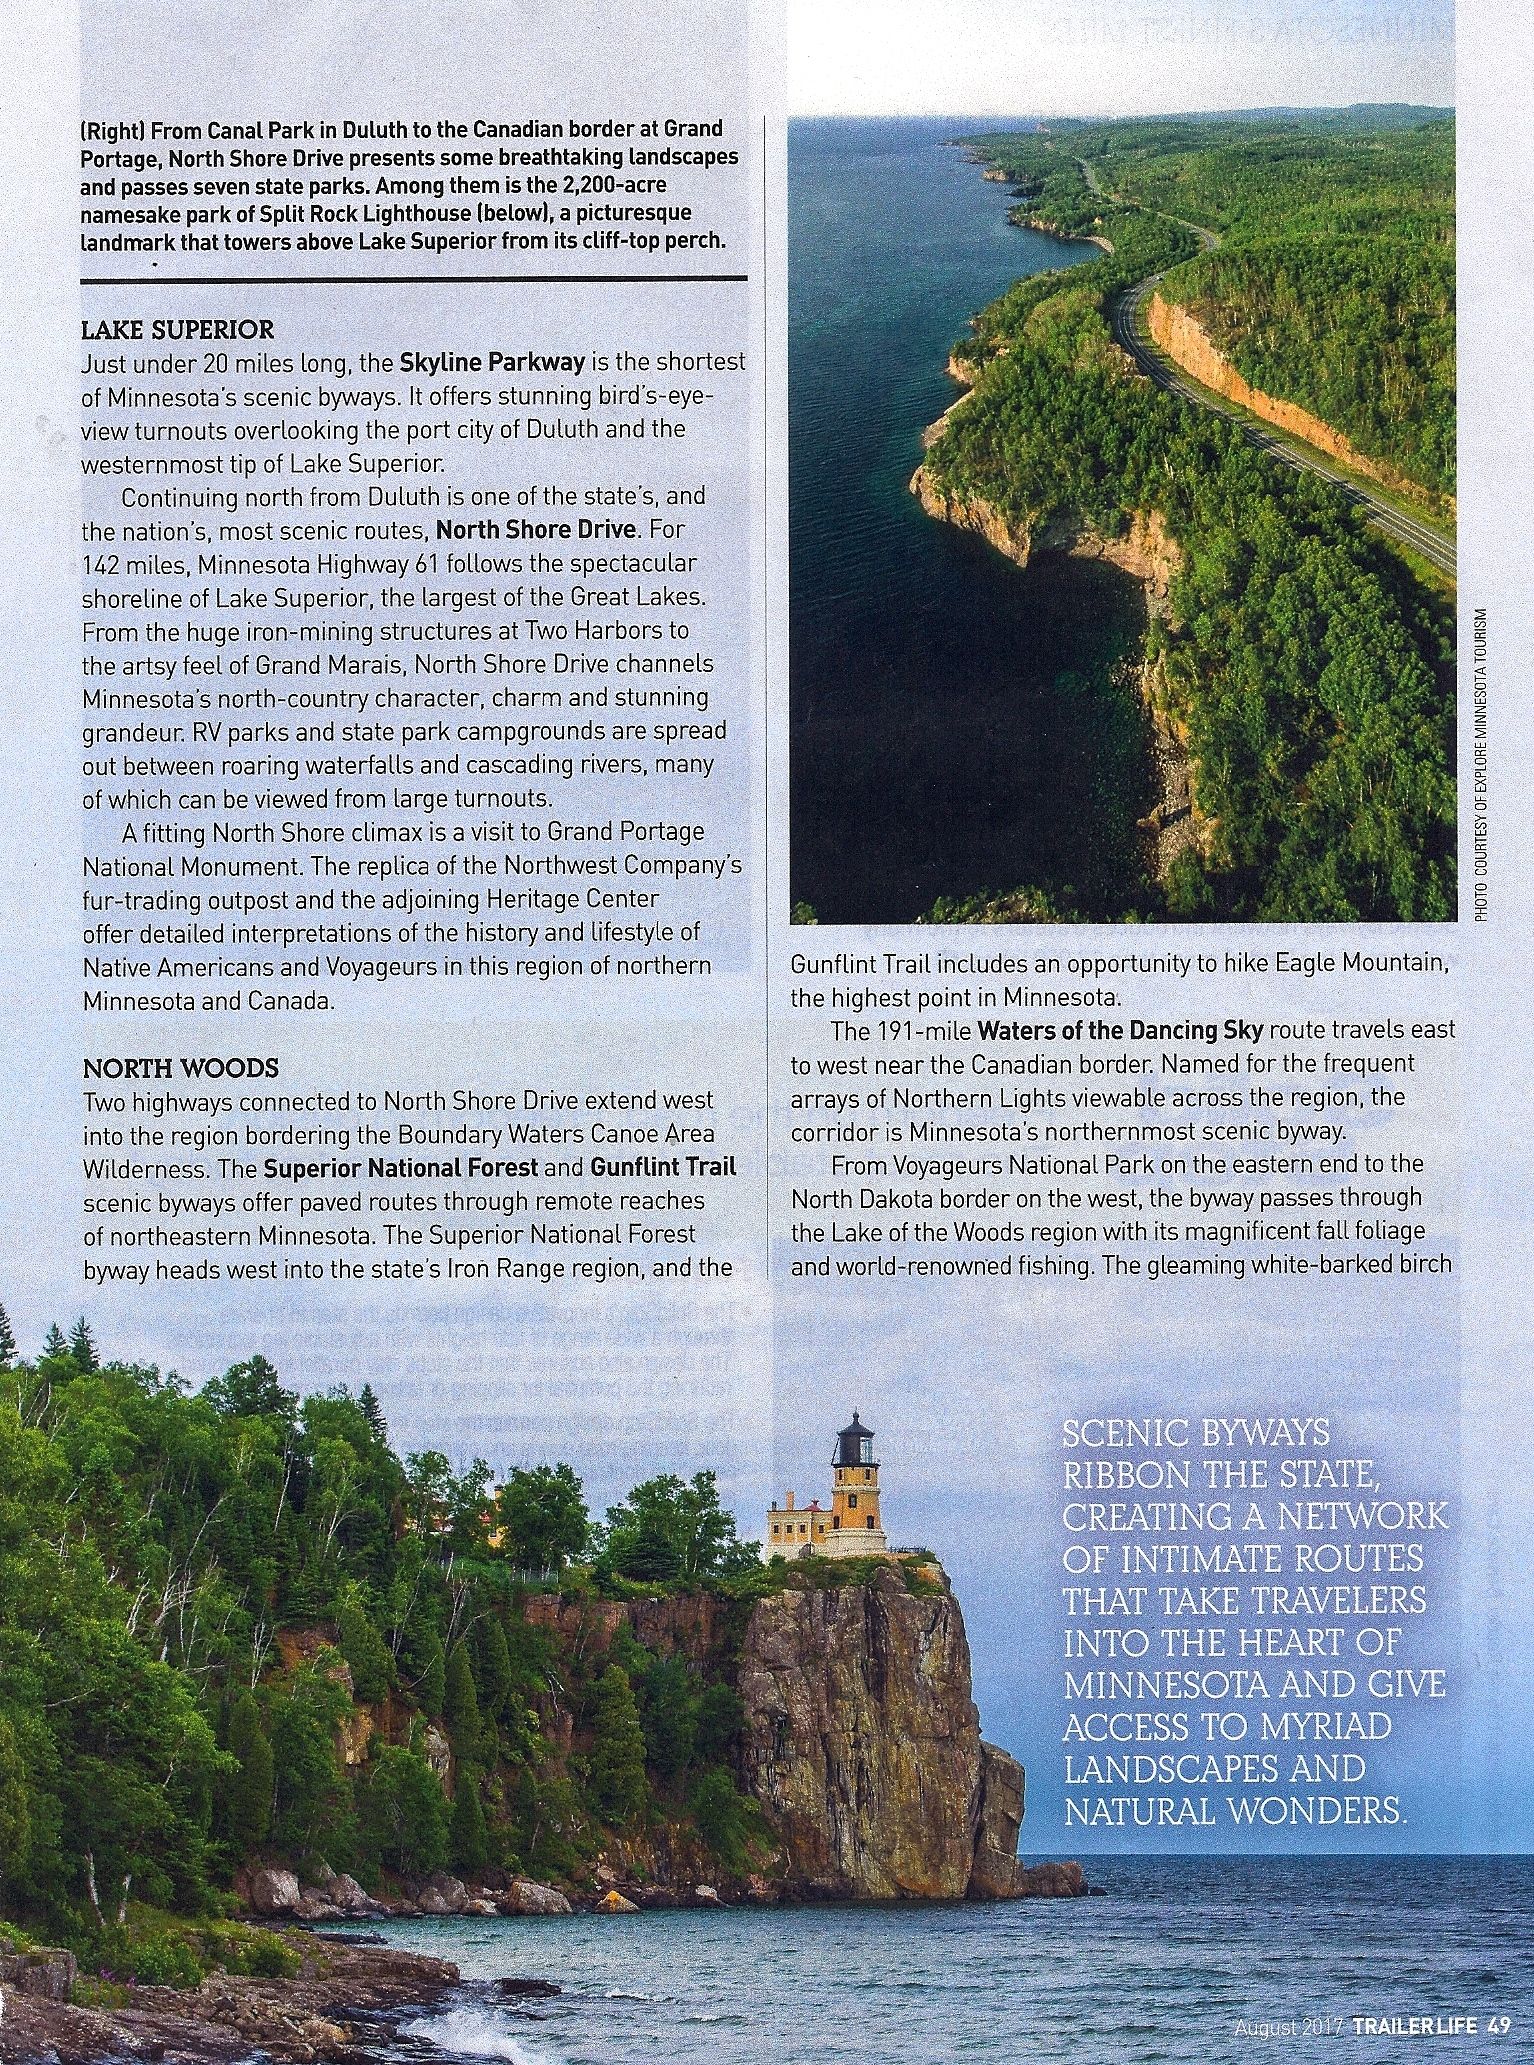
MINNESOTA’S FINEST MILES – Trailer Life Magazine, August 2017


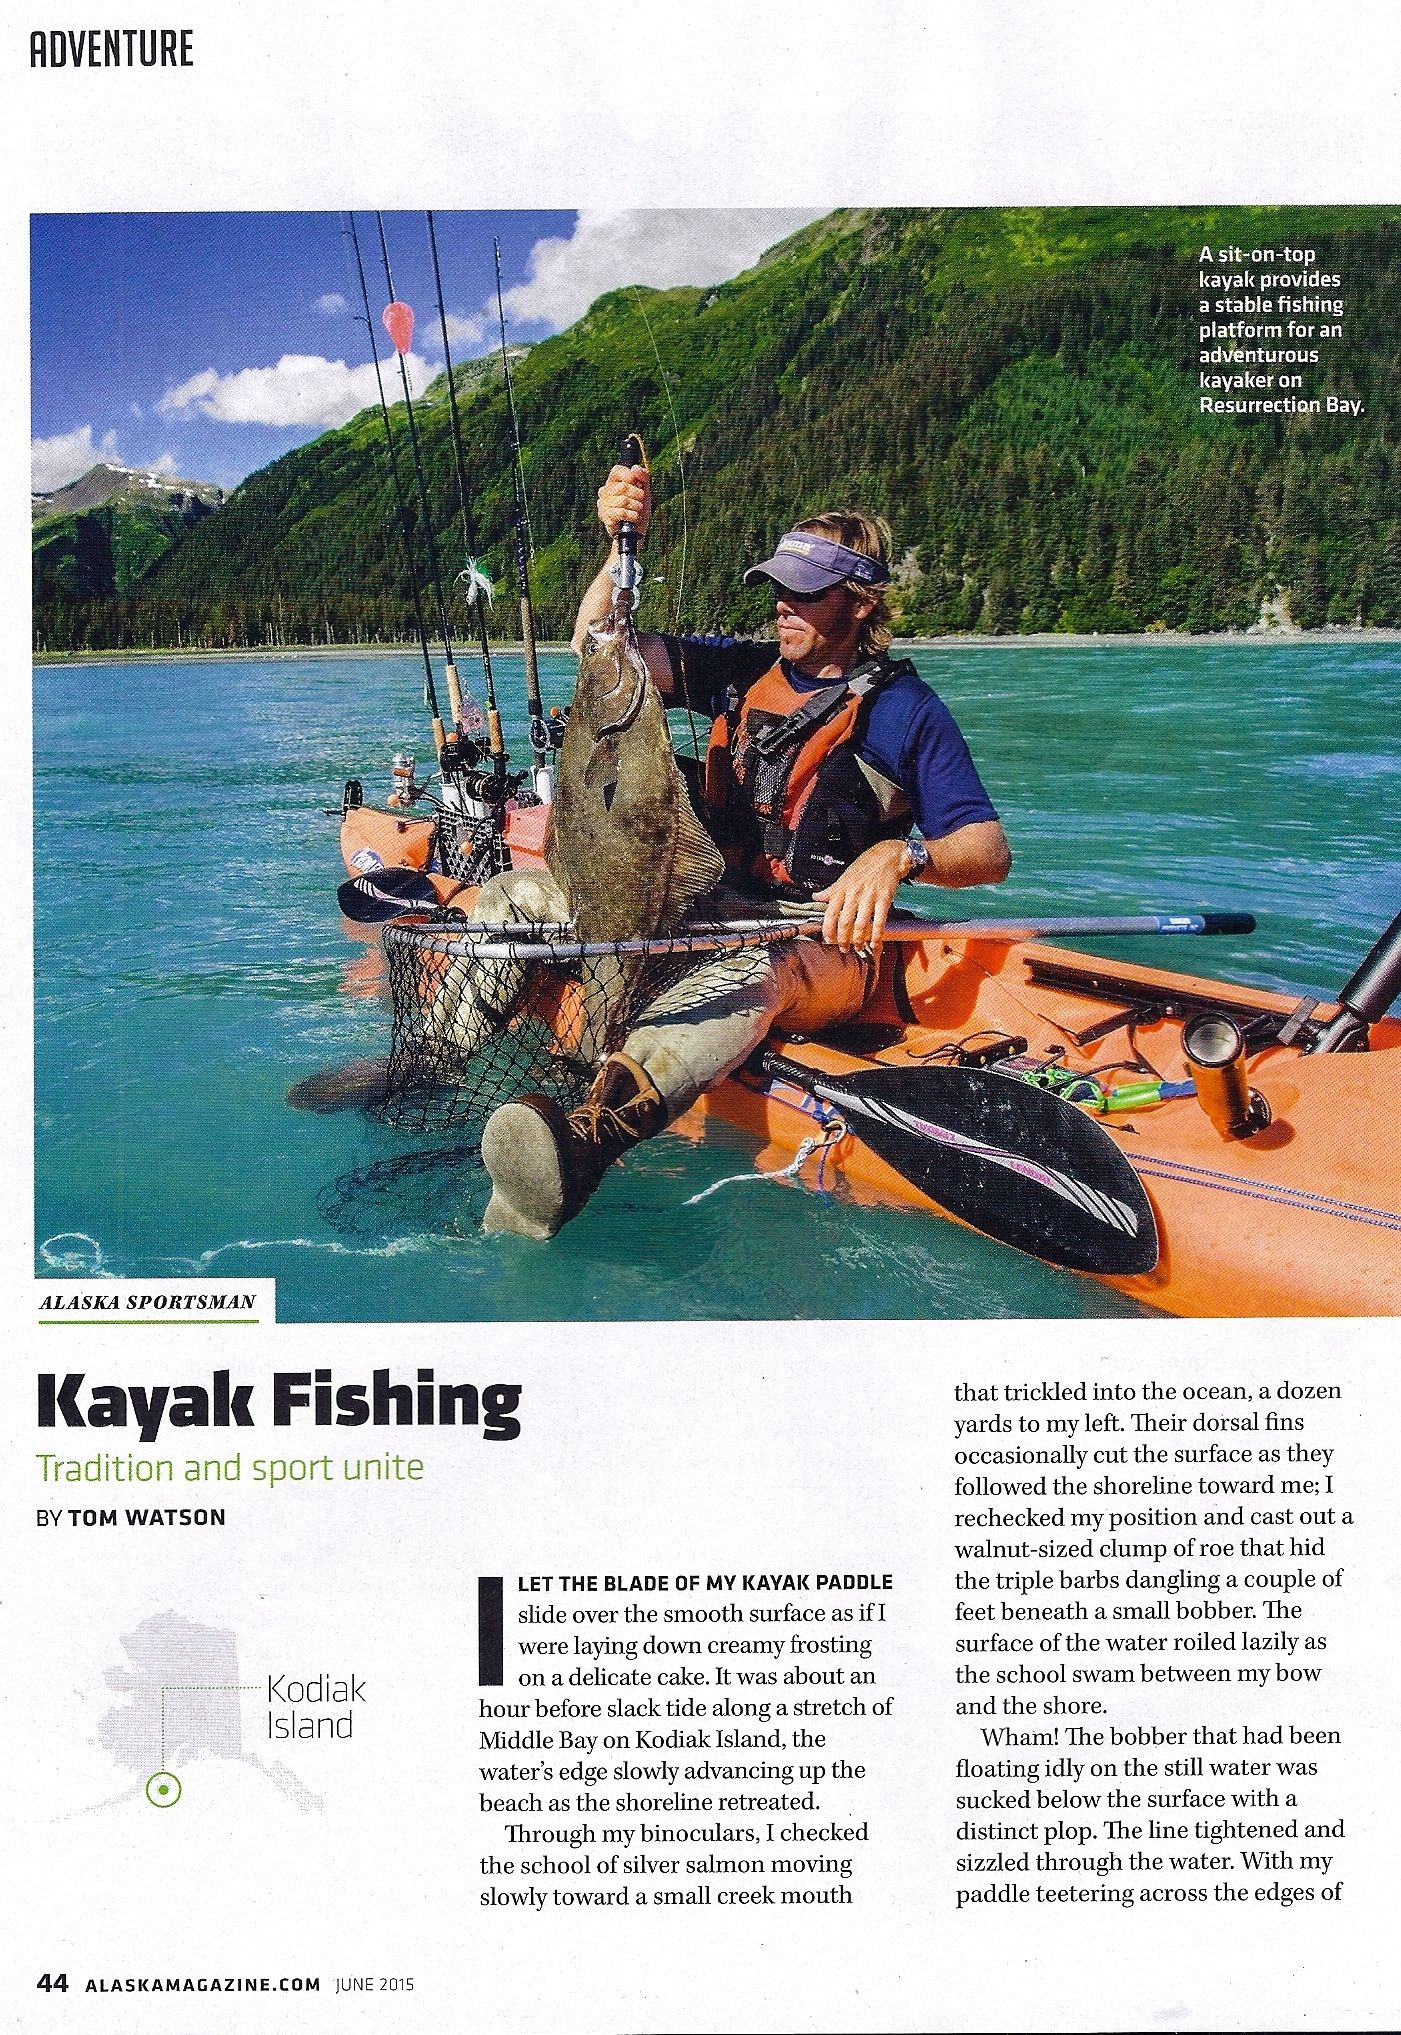
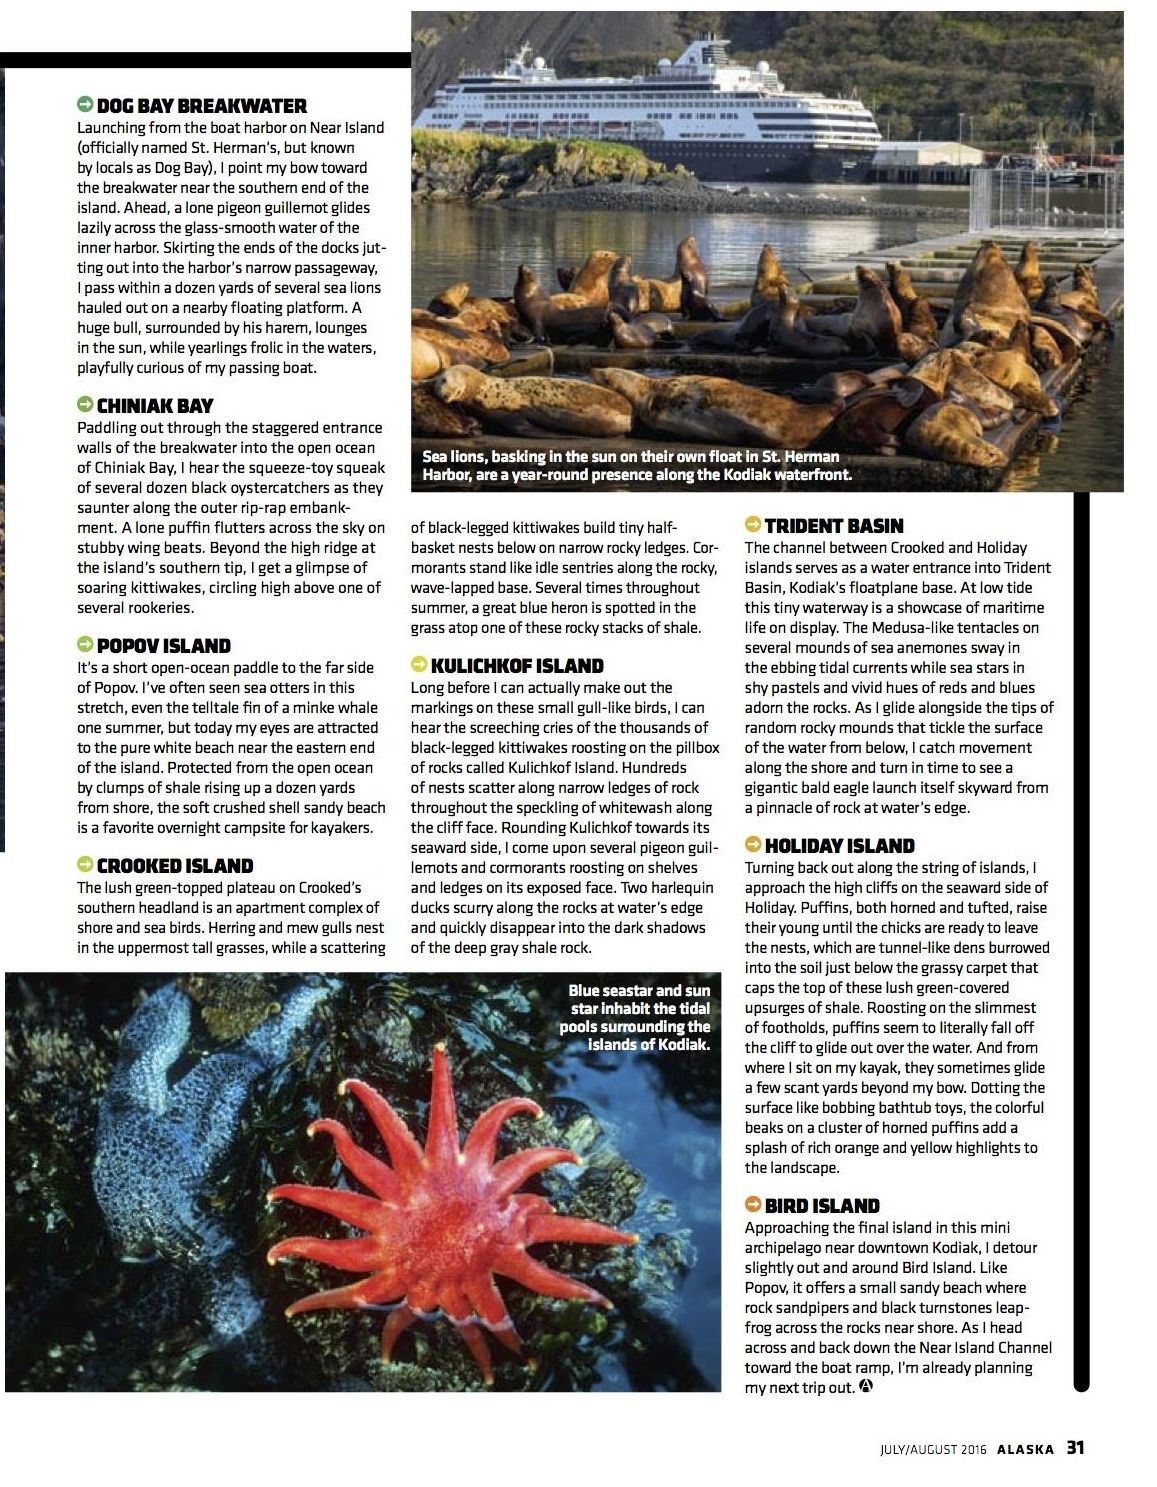
KODIAK BY KAYAK – Alaska Magazine – JULY/AUGUST 2016
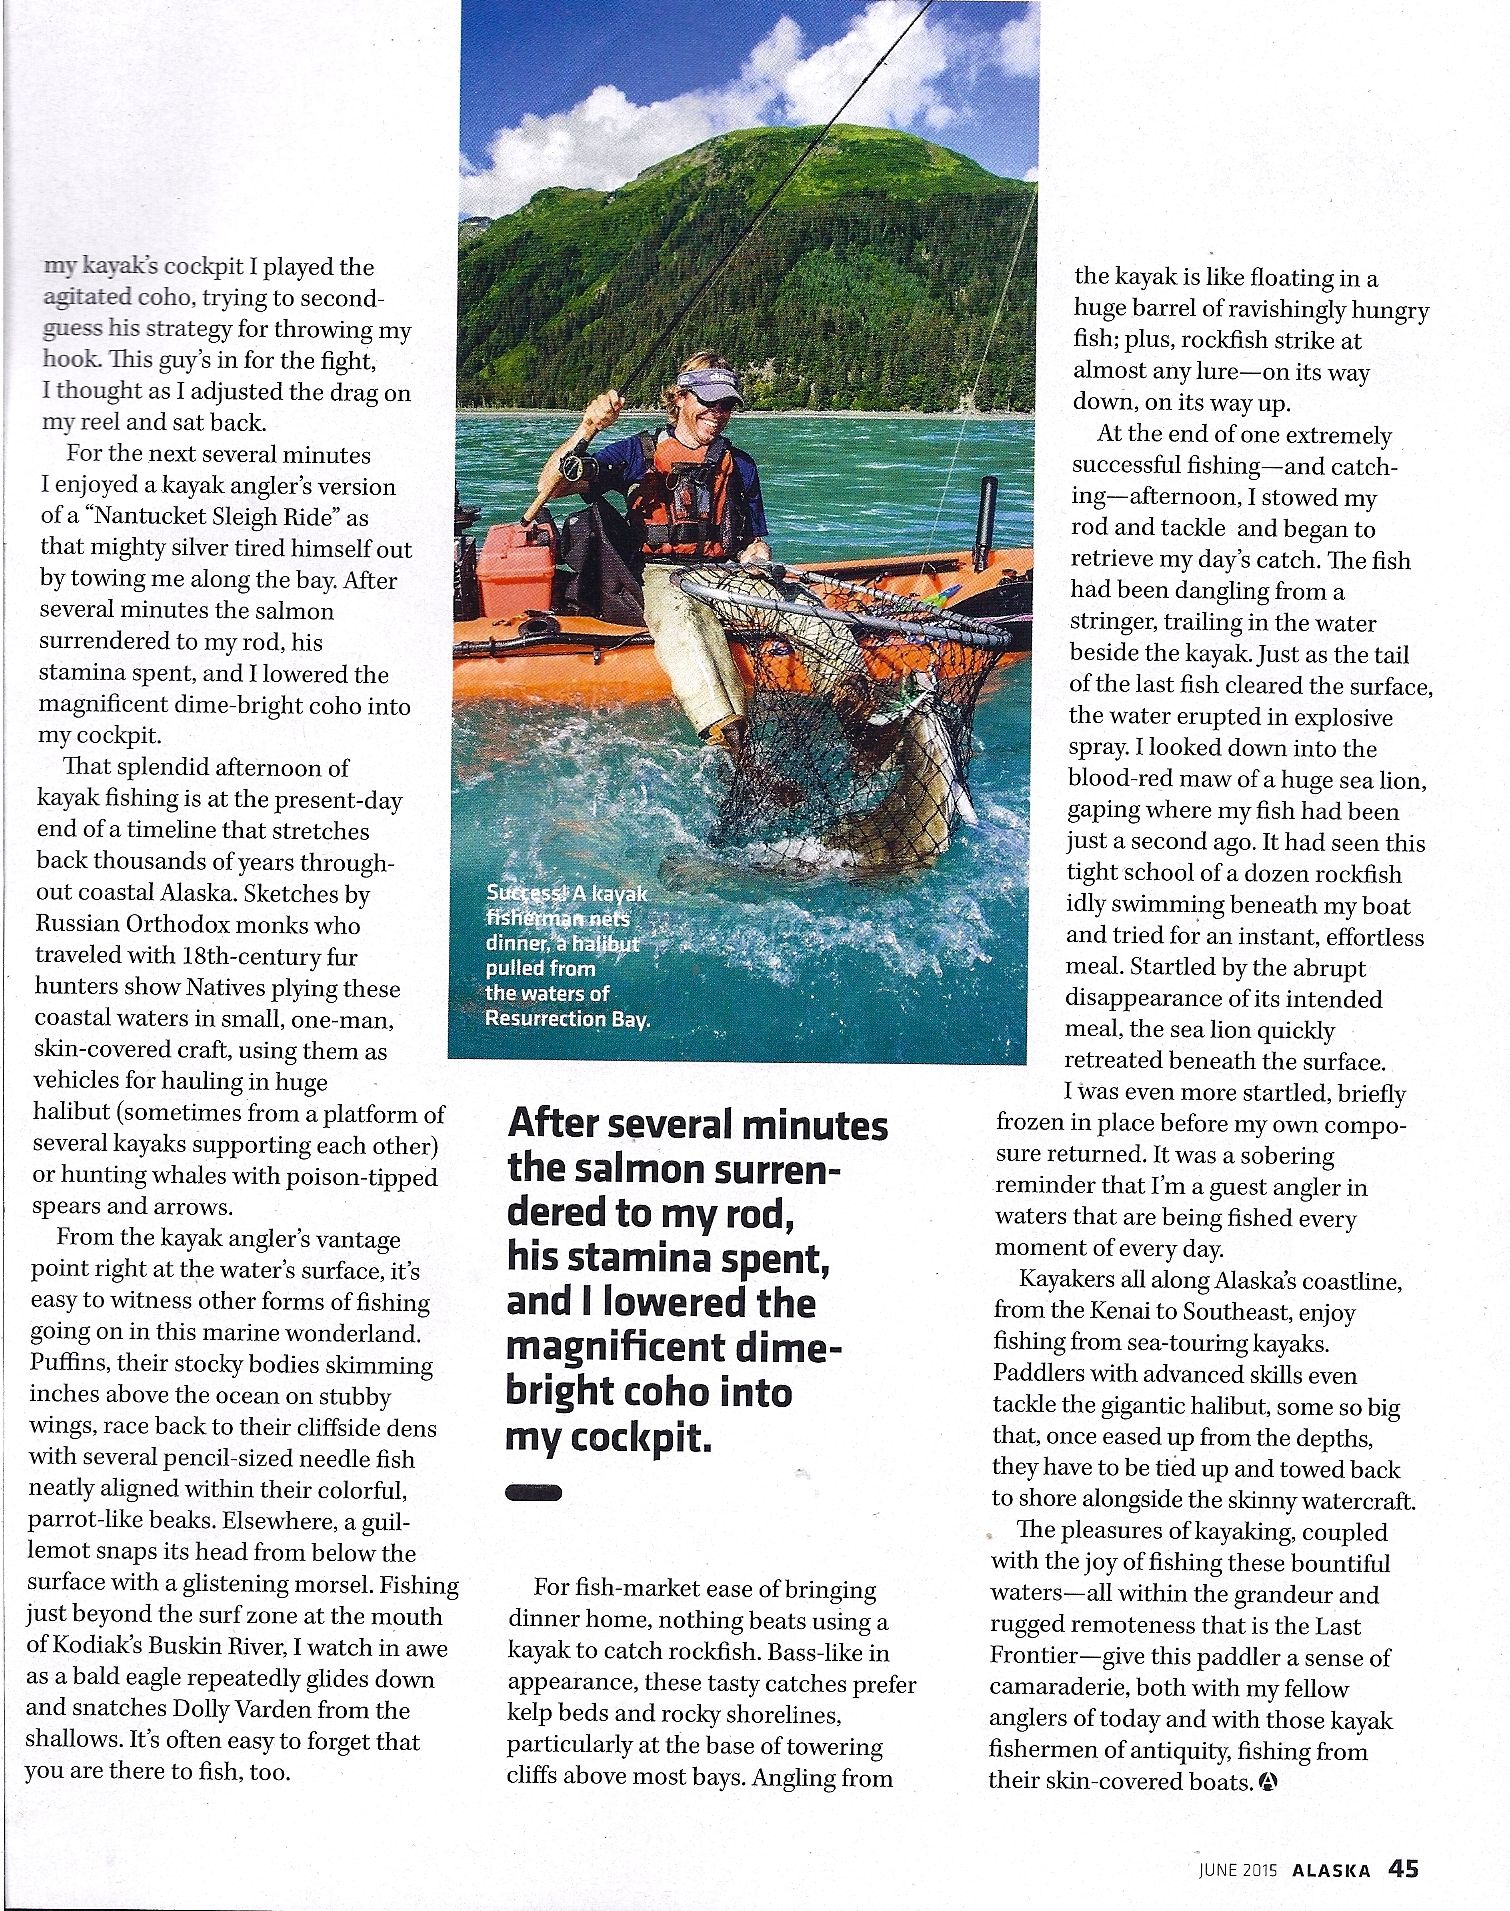
On Being ‘Fished’


Midwest Outdoors column for January, 2018
Self Reliance – It’s a State of Mind…
Every now and then, as we enjoy the outdoors in our own adventurous way, something goes wrong. In the worst cases, it’s an incident that could become life threatening. How we are able to deal with whatever situation is thrown at us will most often determine whether we are ultimately rescued – or merely recovered!
Being self-reliant in the outdoor environment is founded more in one’s sense of place and purpose rather than in merely knowing an assortment of often impractical survival “parlor tricks” or wielding the biggest survival knife. Surviving has to do more with being a resourceful MacGyver than a machismo Rambo.
All outdoor survival situations and exercises in self-reliance begin with the most basic, yet most important fundamental asset: Positive Mental Attitude! PMA is the driving force that energizes your will to endure and survive with hope and perseverance. Having a clear head, supported with positive thoughts, will be the most critical tool you’ll have in your mental survival kit.
Practical skills are important, too! The ability to adapt to whatever your situation and environment have thrown at you means using an inventory of skills, learned and practiced, to help minimize your predicament – all the while maximizing your options for rescue. Because the outdoors can toss you a curve any time, and in any environment, how do you know which skills will be the most critical, the most practical?
As important as it is to know what to do, is knowing why you are doing it! What’s the ultimate goal of a particular skill? Being proficient with flint and steel is key to starting a fire, but that’s because being warm and dry and seen by rescuers is critical to your survival. Knowing that being wet and cold can quickly lead to hypothermia (what was once referred to as “exposure”) and death, demands that you use your PMA and skill base to make sure you stay dry and warm.
Imagine this scenario: It’s late in the afternoon, you’re leisurely enjoying a day hike – and there’s some nasty skies approaching from the southwest. You decide to hunker down and set up camp to ride out the oncoming storm. You gather wood for a fire, but then spend the next hour trying to spark up a flame using that new flint/steel kit you bought just a few days earlier. Right around dusk, the weather takes a nose dive and the wind starts hurling raindrops at you. Now what? You don’t have a tent, so you don’t have a shelter. It won’t be long before you are cold and wet – hello hyperthermia!
Perhaps your time would have been better spent using your physical and mental resources to first construct at least a temporary shelter, and then tackling a fire. Being warm and dry by any means is the critical “why?” factor in this situation. A big pile of leaves under a make-shift roof serves your needs much better than sitting in the rain next to a cold and damp pile of noncooperative kindling.
Surviving using your self-reliance skills should be approached by applying a series of defined processes, not random efforts. Commonly referred to as the Seven Steps to Survival, these procedures have been defined to be carried out in a specific sequence of processes – each step designed to help you towards achieving your ultimate goal of being rescued. Those seven steps are:
- Realize and accept that you are in trouble – kick yourPMA into action!;
- Assess your situation – for injuries, for further or eminent danger – for resources;
- Create a shelter – you can always upgrade from a temporary shelter later;
- Create signals – Fire and/or smoke, in a series of 3, or large letters/symbols, in highly visible-from-above locations;
- Find a safe water source – know how to purify it before drinking;
- Eat – food is fuel for both body and mind, but not essential for several days;
- Play – Yes, it’s important to relieve at least a little mental stress. Let your PMA downshift a bit, too, you’ll need it to be fresh and active to motivate you through your ordeal.
Within these seven steps are processes that can help each task succeed in optimizing your survival in most all cases. Again, since you never know what skill sets you will need to rely upon, knowing the “why” behind each step can help your PMA mindset come up with alternative and perhaps innovative life-saving tasks.
The most practical skills that those that are basic in function, easy to execute and don’t cause you to expend a lot of valuable energy to accomplish. Practice skills at home that you feel may be most helpful, especially if it involves new or untried gear (flint/steel, or make-shift water filtration system). Work out the bugs in the process or application before your life may depend upon it to work in the field.
Likewise, choosing gear that can take on multiple tasks in a time of emergency (waterproof bags to haul/collect water; brightly-colored packs waved as signal flags) can extend your options when your situation turns south on you.
Even a short day trip into relatively tame backcountry can go bad should you injure yourself, have a major piece of gear fail or if Ma Nature develops a threatening attitude. Being a self reliant outdoors person, having even basic survival skills coupled with a positive mental attitude is your best bet towards the optimum goal: a life-saving rescue in most any emergency situation.
Better Kayak Posture Means Better Paddling Efficiency

With any “muscle powered” watercraft, the better you are in contact with the boat, the less fatigued you’ll be after a day of paddling. Whether maneuvering along a weed bed for bass or skirting the shoreline in a protected bay, the better contact you have with your boat, the more effectively you can direct the power of your paddle stroke from the water – and minimize the stress it puts on your body.
As the paddler, you are pulling your kayak through the water by passing the resistance against your paddle blade up the shaft, through your body and out to the boat to make it move forward. The more spread out and balanced those contact points are between your body and the boat, the more effective your power stroke – and the less demand on any one point on your body. Even if you just make occasional, short distance moves, over an extended amount of time or distances, you’ll want those paddling power points to be well balanced.
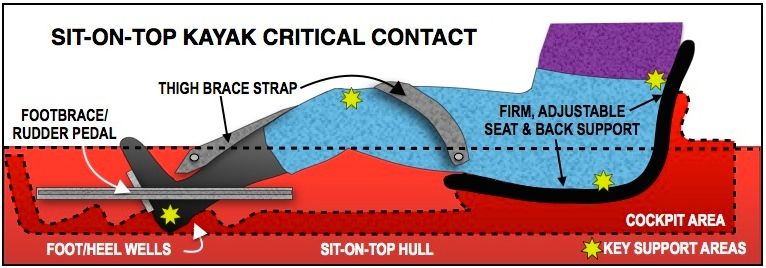 There are four key paddler’s contact points in a kayak: 1) foot; 2) knees/thighs; 3) seat/back; and 4) arms/upper torso. Here’s why each area is important.
Feet – provides a firm connection to the boat and channels the forward power from the paddle to the boat via this vital contact point. Foot braces, more so than heel wells, allow you to press firmly against the hull, transferring a part of that stroke power evenly to the boat.
Knees/thighs – traditional decked kayak cockpits usually have pads located along the coaming that enable the paddler to “grab” the boat with the knee/thigh to add additional contact support to the kayak. Sit-on-top “kayaks” have the option of a thigh strap (similar to what canoeist use) to provide a firm but easy-to-release strap that the paddler can slip a knee under.
Seat/back – Without the firm support of your feet/knees, all the power of paddling goes through your butt/back area, putting all that stress squarely on that pivotal region of your body. If you constantly have a sore lower back after paddling, start using your feet as a primary contact point. An adjustable seat makes a big difference, too.
Arms/shoulders – a good kayaker uses both upper body and shoulders to paddle – not just their arms. Called “torso rotation”, this techniques relies on your arms, shoulder and upper body to provide power to your stroke – it’s much less tiring and requires only a subtle twist of your torso to distribute paddle power.
Even with proper paddling posture you may still be tired after a day of kayak fishing, but hopefully it’ll be because you’re worn out from repeatedly handling a landing net and not from a paddle!
![]()