ALL PHOTOS AND IMAGES (unless otherwise credited): © 2018 Watson
Preface: On Self Reliance – and being more competent in the outdoors…
Defined by Webster’s as: “Reliance on one’s own efforts and abilities”, Self reliance is the basis for survival, the foundation upon which you stay alive and rescued (by self or others) from an emergency situation – rescued; not ‘recovered’!
This isn’t about slick or sloppy YouTube video dramas, theatrics and ‘dog-n-pony’ survival parlor tricks. It’s not about Rambo knives and Rube Goldberg snare contraptions. Rather, it’s about dealing with real, lives-at-risk, emergency situations – utilizing practical, available resources, a reliable knowledge base and information – and then doing what you need to do to mitigate the situation.
How it all started – My early years
The Boy Scouts was my official introduction to being self reliant. I had always enjoyed “the woods” and being comfortable in that environment and learning basic skills. The Boy Scouts enabled me to expand upon that love of the outdoors my father had instilled in me. The official handbook was my survival manual, merit badges were my rungs as I climbed the ladder of skill and knowledge as I learned more about taking care of myself outdoors.
The only other reference to which I was keenly aware, and clearly the most definitive book on the subject at the time (1960s) was the U.S. Air Force Survival Manual. It was probably the “go to” Bible as a source of survival information. A “how-to” self-reliance resource when stuck behind enemy lines (Korean War/Viet Nam era). Military-based survival procedures are unarguably the foundation for today’s self-reliant aware outdoors person.
All that’s great if you are a downed pilot hiding in the jungles of SE Asia. But what about the average weekend warrior/schmuck who finds him/herself stranded on a remote shoreline after their boat capsizes? Or the clueless hiker forced to seek shelter in a sudden storm? Or even the seasoned, backcountry outdoors person who simply has suffered a demobilizing injury or lost critical gear? These are the emergencies that will call upon you to use your own self reliance to save lives and be rescued…
– and a bit more on the subject. . .
I am taking a new approach on my interpretation and presentation of the term “self reliance”, specifically as it relates to “Survival”. Before I explain my thinking, I want to offer another thought for your interpretation of where all this is going.
Oftentimes you’ll hear an experienced outdoors person say, “I’ve never been lost”, only to admittedly add, “but I have been temporarily disoriented!” We might smirk, but there is actually truth to that. One’s brain can be temporarily muddled as far as knowing where you are at the moment. Taking some time out to relax will often get everything back in order to help you re-construct your actions and movements to again assess just where you are and what direction to take (forward OR backwards) to get where you want to go.
Situationally Challenged –
Well, the same thing is true for emergency situations. Maybe you are not in a survival mode yet, merely “Situationally Challenged”. Something’s gone wrong – you’ve lost a piece of vital equipment; you’ve over-extended your stay in a threatening environment or an injury has significantly changed your anticipated plans. Are these serious concerns? Absolutely! Are they automatically catapulted into survival mode status? Depends!
It depends upon your training; it depends upon what you’ve done prior to the reality of the situation (pre-preparation, acquired skills, etc.). You may be inconvenienced, knocked down a few notches on your comfort levels, but are you in a “survival” mode as we’ve all come to envision in imaginary scenarios we associate with that term?
My point is that while taking extreme survival courses or heading out into the woods for a “let’s be a survivalist” weekend might let you play around with some primitive skills, it most often doesn’t address the real-life experience you’ll actually have to deal with in a true emergency or challenging situation.
On being Competent –

Knowing why you should do something is as important as knowing what to do.
Let’s look at the definition of “competent”, particularly as it relates to being self-reliant in the outdoors:
COMPETENT: (adjective) – having the necessary ability, knowledge, or skill to do something successfully: (of a person) efficient and capable; acceptable and satisfactory, though not outstanding.
“…to do something successfully” although perhaps vague upon first reading, hits upon two key elements of being competent. The first being “something”- having the know-how through experiential ability, knowledge or skills – to mentally, physically and/or emotionally be able to deal with situations as they arise.
The second part is addressing and hopefully accomplishing what needs to be done in a manner that directly deals with the situation(s) with which you are challenged – and either mitigates or removes that hazard or resolves the predicament in the best way possible, given the circumstances.
What’s perhaps equally significant in this particular definition is the last phrase: “though not outstanding.” That’s important. You goal is not to impress, not to model yourself after some alter-ego or peer/culturally-driven expectations. You’re not a special forces operative, a Rambo-esque wanna-be or even a backcountry “survivalist” – you’re an average outdoor enthusiast who’s in trouble and needs to be self-reliant, outdoor competent, in order to get through a bad, perhaps life-threatening situation to the best of your abilities.
This is what being a competent outdoor adventurer is all about. As important as learning what to do in emergency situations is knowing why you need to do it – relying on your own knowledge to apply skills that will help you face and conquer whatever threats are challenging you.
There are no style points, either. You’re not trying to impress anyone, not even yourself. You are dealing with a situation that will hopefully end in you being rescued, either through your own efforts or by others. The alternative outcome is being “recovery” and carried out in a body bag!
Case in point –
Knowing how to start a fire with a bow drill apparatus is a macho thing to accomplish, but is it the most efficient, energy-saving method of creating fire? Likewise, ensnaring a rabbit is indeed impressive, what’s the real likelihood there actually are rabbits in the area (and, by the way, you ARE an experienced rabbit hunter, right; you know the signs, their behavior, where to hunt for them, right? Right!) Will you know where to set your snares (assuming you can even build any that work); or how many?; or how much time and energy you’ll expend setting enough snares that the law of averages is in your favor?
How about those massive slabs of rocks gingerly positioned to trip and squash your dinner? How many of those will you need to build? Imagine all the nutrition you’ll get from the remains of one tiny vole you peel away from the underside of that weighty rock – that smashed scab of fur and bone-crushed, intestine-contaminated bloody wafer from the weighty rock that fell on it?
Dinner time, Rambo! –
Here’s an idea for all you survivalist enthusiasts – go out and capture a vole or house mouse and secure it on top of the flat surface of a concrete block or stone. Now take a regular house brick or comparable flat stone, raise it up and slam it down squarely on the rodent – in one forceful, solid, gut-squishing, brain-crushing, blood-splattering, fur-flattening blow. Yummy! You’ve secured dinner!, You’re a survivalist! Bon Appetite,
Being truly “self-reliant”–
Being self reliant means: 1) you learn a few basic skills to help you cope with a change of plans (anticipated or unexpected) while enjoying the outdoors; 2) all the while maintaining a Positive Mental Attitude (PMA) and; 3) you cope with making due with a variety of tasks and skill sets to preferably help you minimize being “situationally challenged”. You may still end up in a serious survival mode but like most things in life, prevention is most often the preferred route rather than having to deal with the cure.
PMA is your best tool, knowing WHY you are doing something will oftentimes help you improvise, create alternative ways to attain a goal (Why do you build a shelter? To keep dry and warm! Why? to prevent hypothermia! What else can I do to to accomplish that same ultimate goal?). This approach may get you further than simply being told or shown what to do. Also, besides the main uses of a particular tool or piece of gear, always consider multiple uses for everything around you or carried on you.
…and always remember the main tenet of having a “self reliance” or “survival” emergency kit: If you don’t have it ON you, you don’t have it!
My book on survival is more on the concepts of self-reliance than hard-core “survival” – as a foundation as to why certain skill sets and procedures are important in an emergency “survival situation. AVAILABLE ON AMAZON
SCROLL DOWN TO LEARN MORE ABOUT…
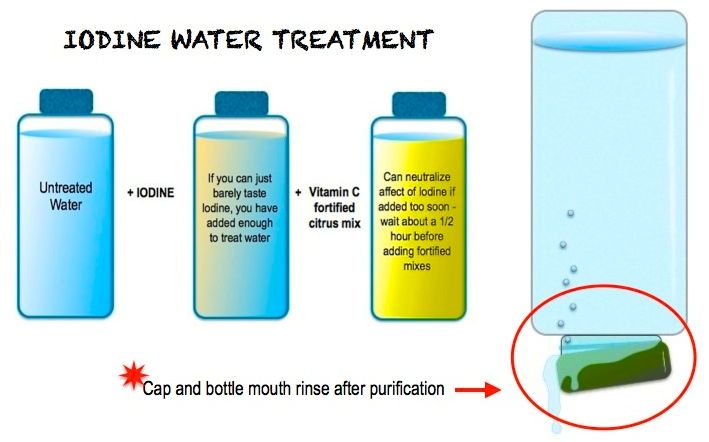
*Being a Survivor Outdoors * 7 Steps to Survival/Survival Sense * Stop the Bleeding * Determining North-South Line Using ‘Sundial/Clockface’ * –Self-Rescue/Falling Through Ice * Walking On Ice * Basic shelter construction – Snow Shelter/Quinzee * Friction Fire Starting/Throwing’ a Spark * Emergency fishing lures – Emergency Rope & Cordage * Ground to Air Signals * Signal fire * Emergency Pyrotechnics/Flares * Emergency Snow Shelter * Iodine Water Treatment * Boiling Water with Rocks * Making a Solar Still
Two rules to being a survivor in the outdoors:
1) Positive Mental Attitude is your best survival tool;
2) Always remember rule number 1!
I don’t like to use the term “survival” when describing skills and techniques for dealing with emergencies in the outdoors. Everything we do has it’s roots in surviving the situation, but how we accomplish that goal is based upon how self-reliant we are in surviving.
My definition of being truly self-reliant is knowing not only what to do, but why it should be done. What is the ultimate goal of a particular task? Is it to keep warm? Indeed, that’s very important. But why? Because hypothermia is one of the leading causes of death in an outdoor environment. We used to call it “exposure”; – exposure due to hypothermia. If we know why we need to keep warm, knowing what to do might come earlier in the process and might inspire us to use our brains to come up with innovative ways to create and sustain that needed warmth.
Knowing skills and how/when/why to prioritize them is a fundamental part of this process. Case in point:
You become lost and are forced to overnight in the woods. It’s about a hour before dark on a cloudless night so you decide to try to build a fire. You find barely enough dry wood only to discover your lighter won’t work and are forced to use the flint-steel kit you recently bought (but have never actually used to start a fire).
After several attempts, and no fire, it starts to drizzle, a downpour is eminent. You have no fire nor do you have a shelter. Now you are cold, and wet – Hello to the onset of hypothermia! Perhaps if you would have built a quick shelter first, and then concentrated on a fire (or had someone else working on a shelter while you were fire building), you’d all have a place to come in out of the rain and minimize the hypothermia threat.
Making a shelter first and building a fire second are both key factors in preventing hypothermia, but only when done in a prioritized order.
![]()
7 Steps to Survival –
Survival Sense for the outdoors.
(I first learned of these seven steps from Wade Watkins, a survival instructor in Kodiak, Alaska back in the mid-1980s. These seven steps to survival should be applied to any outdoor emergency situation where your self reliant skills will help optimize your survival and ultimate rescue…)
One day, it’s bound to happen: your attempted beach landing in the surf fails and your boat is swept away while the waves dump you onto a beach; or that incoming tide was a bit higher – and faster – than you thought and now you are stranded on a remote beach without any gear. Whatever the scenario, (canoers and hikers, you can imagine your own emergencies as well) survival situations create a great deal of anxiety in victims. .
Most prudent paddlers are prepared do take recovery actions after an unexpected capsize, but as a paddler – seasoned or novice – how prepared are you to deal with the situation if you lose your boat? How competent are you to survive a night in the maritime or backcountry environments without a tent, sleeping bag or even food and water? Could you survive the elements? Would you know what to do and when, or how to perform the right tasks to survive such an ordeal?
Members of the U.S. Coast Guard and Alaska’s commercial fishing fleet share in these concerns on a much greater scale. In response, the Alaska Marine Safety Education Association developed the Seven Steps to Survival for those whose livelihood is the marine environment. Taking those seven steps – a sequential checklist of what do in a survival situation – and modifying them for use in the paddling community, I expanded these seven steps into “survival sense” tips that can be used by anyone in an emergency situation in the outdoors.
Like a pilot’s checklist, the seven steps on the survival sense list are meant to be followed in the sequence presented. They are meant to minimize the already anxious environment of a survivor situation and provide a routine to follow to offer everyone the best chances at being rescued. ( You want your emergency to end in a rescue, NOT a recovery!)
The Seven Steps to Being a Survivor:
 1. KNOW and accept the fact that you are in a critical situation; realize the need to activate the seven steps. This may seem obvious – your boat is lost, you’re sitting on the beach like a drenched rat. It’s OK to yell, cry, kick sand in the air, (many call this e the “Oh Shit!” stage of realization), but get over it soon and start thinking positive; start acting like a survivor. Know you need to take command of the situation; realize you are in trouble and start the processes for being a survivor. You may be called upon to be in a position of leadership, these seven steps will help you help everyone in your party.
2. INVENTORY – Check yourself for injuries first, and then others. Assess any cuts, scrapes, bruises or other types of injuries that might be hidden from immediate view (some tight-fitting outer clothing can prevent bleeding from being obvious at first inspection). Once this initial inventory of self and associates is taken – and injuries are dealt with – it’s time to assess the surroundings. Will you have an adequate location to build a shelter? Are their any natural hazards or potentially dangerous situations present or upcoming (tides, unstable overhangs, etc.) that could create problems down the line? What resources are around you that can be used to collect water or build a shelter?
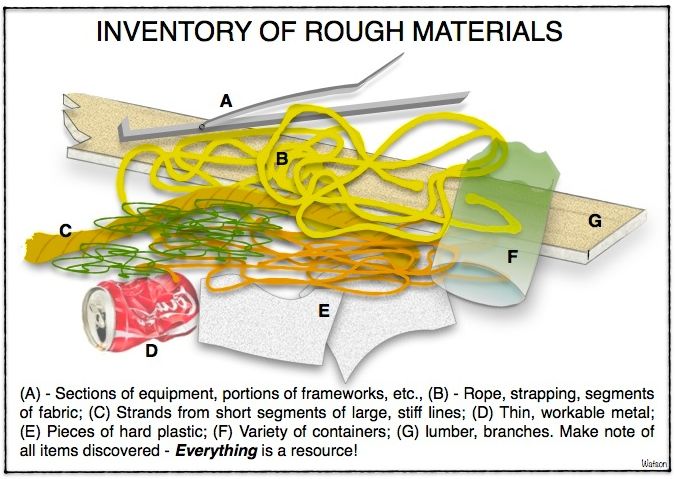 It’s important to make a mental note of resources available. Don’t dismiss anything during your inventory. The scrap side of a broken pail can be used for digging or wetted and used for reflecting sunlight for signaling. Think like a survivor! A thick/short section of woven rope can be unraveled into workable strands that can then be tied together to use for lashing, fishing line, etc.
3. SHELTER is perhaps the second most vital concern next to serious or life-threatening
injuries. Hypothermia is the leading killer insuch incidents. Headlines used to read “Died from Exposure” – death caused by a fatal lowering of body warmth.
 You can always upgrade your shelters as time and materials permit. The important thing is to have protection against the elements, even if marginally at first. You can always add on to, or create a more effective shelter later – or continually – as part of your survival maintenance.

4. SIGNALING for help is an eventual task you’ll want to perform. Some argue that there is no need to signal right away because no one will know you are in peril. I argue that in some areas, routine or scheduled movement by air commuters or other commercial modes may be passing by and could respond to a signal that would stand out from the routine. Knowing, for example, that an island ferry always passed by at a certain time, would encourage me to have signals ready.
The most important thing to remember about signals is that you want to create contrast, a visual (and sometimes audible) disturbance – some visual effort that stands out in contrast to its background. Know, too, that it’s very difficult to see signals from the air. To be effective, a ground sign must be at least three feet wide and 15 feet long. Three fires in a triangle (bright flame by night, dense smoke by day), or three gunshots fired in succession are recognized international distress signals. Any bright piece of fabric works as a signaling device. Think of that the next time you are deciding upon which color of raincoat or stuff sack you want to buy.
5. WATER is essential. Life’s critical three’s: you can live 3 minutes without air; 3 days without water and at least 3 weeks without food. If you do have food but no water, cut back on your eating. Your body needs water to perform its metabolic processes and foods containing protein require more water to digest than do other foods.
Water sources can be free-standing or flowing as found in lakes and streams or by collecting rainwater, either as it falls or by retrieving it from natural depressions. Water

can even be collected by wiping the dew off of plant leaves, grasses, even that which forms on your gear – and then ringing that saturated cloth into a container and repeating the process. I collected over 250 ml (a cup) of morning dew in less than five minutes using just a bandana in a small patch of grass.
Most water will need to be purified before drinking. It is also important to drink lots of water – drink it if you have it (don’t ration) and then go out and find more! It will pay off to learn basic water collecting skills and then practice them before you need to rely on those skills in a survival situation.
While you should technically/officially NOT drink non-purified water, most biological impurities take several days, weeks before you feel their affects – it may be better to risk illness over dehydration in the interim between consuming and potential sickness…
6. EAT/FOOD – Our bodies do need fuel. There are two things to remember about survival eating:
- If you don’t know what it is, Do not eat it;
- Just because it’s edible doesn’t mean it’s going to taste good.
Most of the Coast Guard personnel I know carry a bottle of Tabasco Sauce™ in their survival kit for this very reason.
There are several plants that offer satisfyingly edible, and good-tasting, parts. Most insects offer some food value. Coastal residents have a saying that if the tide is out, the table is set. It’s a tribute to all the edible sea critters to be eaten. This is another skill that should be learned and practiced before being called upon in the field.
Your body uses water to help metabolize your food. If you have ample food but minimal water, cut back on your eating. You can go a lot longer without food than you can without water.
PLAY – The very best survival tool a person has is right between one’s ears! You will hear that keeping a Positive Mental Attitude (PMA) is the most important, critical survival tactic. Organizing games (who can collect the most edible plants, or find the most firewood). The idea behind this last step is to keep everyone as positive as possible, keep spirits up and many of the emotions that challenge any survival situation can be kept under control.
Here’s a handy acronym to help remember these seven steps: KISSWEP
Know you are in trouble so you can start the seven steps process mentally and physically.
Inventory assessment of injuries to self, others and inventory anything that might be useful for completing later steps.
Shelter – protect yourself from the cold – or heat – to ward off hypothermia. IMPORTANT – shelter before fires! Get a warm, dry shelter first, then if it starts to rain while you are trying to light wood…you are warm and dry!
Signal preparation means lots of contrast, bright colors, fire/smoke in sets. Anything out of the ordinary to catch someone’s eye. Signal mirrors are very handy in daylight – no batteries! Have several forms of signals ready at all times.
Water – to the point. It’s critical; always have a means of collecting and purifying it.
Eat – you’ll want some food but you can go several weeks without it.
Play – keep that PMA going!
Developing a self-reliant survival sense will help prepare you for many conditions that could threaten your life. Learn skills and practice them ahead of time. Be prepared by anticipating situations and have the proper equipment (think multiple purpose for each item). Also, this list can be referred to over and over again as circumstances may change. Be safe, be a self-reliant survivor.
Stop the Bleeding!
(ORIGINALLY PUBLISHED IN “SELF-RELIANCE” COLUMN/MIDWEST OUTDOORS/DEC. 2018)
One of the most critical aspects of backcountry self-reliance is first aid for bleeding wounds. Short of actual experience dressing real injuries in the field, most training in treatment of bleeding injuries is through simulated exercises as part of first aid/EMT-type courses. However, it’s always a good idea to refresh you knowledge of basic skills so that when the time comes for action, you at least have a more focused base of information to call upon. Doing your homework on the fundamentals of treating a bleeding wound now may save you critical real-time minutes afield.
The outdoor arena is full of things that can slice, poke, tear and scrape at our flesh at nearly every turn. The four types of bleeding skin injuries are:

- Lacerations – deep cut or tear;
- Puncture – piercing/impaling of the skin with a sharp object;
- Avulsion – skin torn from your body, missing tissue;
- Abrasion – Scraped/rubbed skin against hard/rough surface.
First Aid for these common types of bleeding wounds follows three basic procedures:
- – Stop the bleeding by applying direct pressure to the wound using gauze, clean cloth, or even your hand if necessary. If your material becomes blood soaked, add another layer on top – DO NOT REMOVE THE INITIAL COVERING. Raise the wound so it’s higher than the level of the victim’s heart.
- – Clean the wound, but first wash your hands! Use soap and water to carefully and gently clean/flush out the wound. Irrigate the wound with plenty of potable water. Do not use iodine or hydrogen peroxide as they can damage tissue. [NOTE: 1% povidone iodine can be used instead of water as a rinse if some unremovable, visible debris remains in the wound].
It is generally considered best to leave an impaled object in place, securing it with bandaging so as not to worsen the wound site. However, if it there will be a delay in getting treatment (even a few hours in some cases), failing to remove the object and treating the wound can risk serious infection.
3) – Protect the wound by applying an antibiotic cream and then cover with a sterile bandage, changing it daily.
The decision to evacuate the victim should be based on several factors including the severity of the wood (deep, jagged); where located (facial); debris/objects can’t be removed; animal bites; swelling/numbness/red streaking (blood poisoning); bleeding continues to spurt or won’t stop after 10-12 minutes.
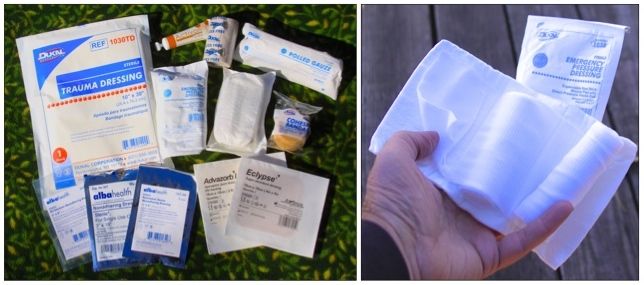
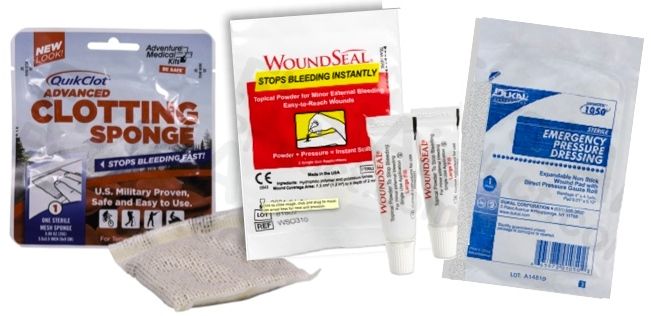
Beyond the array of adhesive bandages and pads found in most first aid kits, there is a broader range of wound dressings specifically designed for serious injuries involving trauma and severe hemorrhaging.
“Combat” Dressings – Severe bleeding can sometimes be stopped by applying a field dressing similar to those used by the military in combat. Typically these dressings are available in a wide range of multiple thick layers of gauze or other blood/fluid-absorbing materials alone or in combination with bandages impregnated with material (powder or microscopic beads) that absorbs the moisture in the blood, stopping its flow.
Dukal, for example, specializes in a broad assortment of sterile gauze pads, patches and other, tight-compressing, trauma-grade dressings for application on many types of serious bleeding wounds.
QuikClot uses Kaolin, an inorganic clay-like mineral, that accelerates the body’s natural clotting ability. Some QuikClot dressings incorporate tiny beads made of zeolite used to promote blood clotting by removing excess moisture and concentrating blood platelets.
WoundSeal Powder uses a powder made of a hydrophilic (water-loving) polymer and potassium ferrate within a pad that when applied with direct pressure over the wound produces a seal in the form of a strong scab. The seal can be applied over wet skin and remains waterproof after the scab forms.
Here are a few tips on slowing or stopping bleeding when in the field:
- Always raise the wound above the heart to slow the flow;
- Applying ice will constrict blood vessels;
- Petroleum jelly can stop bleeding in small, shallow cuts;
- Tea (in bags or soaked cloth) can cause blood to clot and vessels to constrict (due to the astringent in the tannins in the tea);
- Yarrow, a wildflower plant, when dried and crushed into powder or fresh, wet leaves and flowers, can be applied to a wound to stop bleeding.

There are many home/folk remedies for slowing/stopping blood flow – be advised that unless you are absolute sure of a treatment, do not use it as it could lead to infections, allergic reactions or other adverse affects.
Using a Tourniquet?
Applying a tourniquet has always been a controversial first aid treatment. However, there are instances where “catastrophic hemorrhaging” – extreme blood loss quickly resulting in death – may demand the application of a blood-flow-restricting band tightened above a victim’s injury.
Most damage and further injury (tissue death, damaged nerves and circulatory complications) come not from the tourniquet itself, but from the improper application and use of that tourniquet. Multiple injuries where the tourniquet can temporarily stop bleeding in one area while managing another wound and amputation are two examples where applying a tourniquet can save a life – and where the benefit outweighs any potential damage caused by applying the tourniquet in the first place.
The uses and application of tourniquets is a complex and critical aspect of field first aid and should be researched in detail. Forget the Hollywood “use your belt” method (not a good idea, it’s too stiff) and learn the proper fundamentals.
Remembering first aid treatments can be an overwhelming task. Doing your homework and periodically reviewing the processes for CPR and bleeding wound management and treatment can make you a more self-reliant outdoors person – and may just save someone’s life – even your own.
Sundial Compass “Clock”
Determining the current time using direction and sun
In response to an article I posted on being able to find the North-South direction line using your watch as a sundial-like tool, a reader pointed out that this “survival skill” only worked with an analog watch because of its clock face and hour hand; he deemed a digital watch to be completely useless. I was disappointed by his response – and grateful!
Disappointed because perhaps I had failed to convey the “why” for the basis of this skill, and grateful because he had touched on the very fundamental aspect of any learned skill – knowing the reason you are trying to accomplish a certain task . “Why?” being as important as “what” or “how” – and beyond just the physical aspects of being able to accomplish your goal.
Why do we need the watch to determine direction? Simple and direct: We need to know what time it is! It doesn’t matter if we hear it on a radio, use our cell phone or even a super slick, bells-and-whistles digital watch. The time of day is critical because the sun’s position along its arc across the sky is relative to the 24-hour segmented day. At its highest point along the arch, it’s noon, 12 pm. Several degrees along that arc, either before or after its zenith, and it’s either earlier or later than 12 pm and hence, a little bit more easterly or westerly of “high Noon” when its position above the horizon is due south. Using that relative position along the arc and knowing the time, we can fairly closely determine south and mark a North-South line.

To work out the time of day using the sundial compass process, simply work that process backwards:

1) You know the N-S line is half way between noon and the hour of the day;
2) Create your clock face as before, but this time add your N-S line out from edge to the clock’s center;
3) Use a stick to lay a shadow across the clock face on which yo have your determined N-S line, again having it fall from the clock rim through the center. This marks the unknown “hour”.
4) Divide the clock face into the 12 hour increments using your unknown hour hand as your starting point;
5) Count back the marks from the shadow hour hand to the N-S line; (let’s say it was 2.5 units):
6) Now continue counting another 2.5 units beyond the N-S line and mark that as 12;
7) Remember that the N-S line is half way between noon and the hour, and you’ve just determined all those positions, you can now simply count forward from noon to the unknown hour marking and determine the time it represents. In our scenario, there are five hour marks between the shadow and our noon so the approximate time is 5 pm!
It’s always important to know the principles behind the skills you are learning, particularly in an environment that is ever-changing and may not have all the resources you are most familiar with for completing a learned task. Be safe; Be Smart; Have Fun!
Self-Rescue-Falling through ice
I was about 50 miles north of Fairbanks, Alaska, in the dead of winter. The temperature was wavering around -30F as we stood on a river, its surface frozen in twenty inches of ice. As I headed back to shore, the snow-covered ice dropped away beneath my feet. Luckily I was only a couple yards from the alders growing along the bank, so I lunged forward, grabbed a branch and yanked myself onto firmer ice and quickly scurried to the riverbank.
What if I hadn’t been so lucky? Here are step-by-step procedures one can use to rescue yourself after falling through the ice:
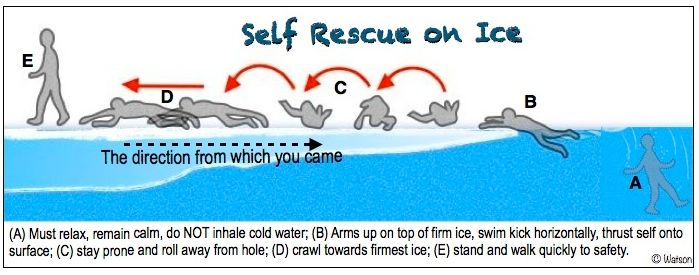
1. Brace yourself, literally! You must consciously contain your reflex to gasp for air, and thereby breathing in water if your head is submerged. This demands great control since your body naturally wants to suck in air. It’s called the “torso reflex.” It also causes your heart to accelerate as your body tries to hyperventilate. It can take 1-3 minutes for your body to “calm down” and acclimatize to the frigid water.
2. Focus energy on getting out. Don’t waste time just treading water; shed any overly heavy or weighty gear but leave your bulky clothes on – trapped air can help keep you more buoyant.
The average person has 3-5 minutes before their muscles are incapacitated, and they start to lose coordination. The bigger concern than hypothermia at this stage is what’s called “swim failure” (neuromuscular cooling). It’s also important to control your breathing, concentrate on getting out of the water – you haven’t much time. Keep your head and as much of your body out of the water as possible. It can sometimes take up to 45 minutes for hypothermia to kick in so use whatever time you have before you pass out.
You must focus on getting back to the edge of the ice where you fell in. You know the condition of the ice you traveled on to the point where it failed, so that’s the side where you want to get back out.
3. Get Horizontal – Get horizontal and kick your legs as you swim to the edge of the ice. Get as much of your body out of the water, propping your forearms and elbows up and propel yourself up and out of the water. If you have ice awls, this is the time to use them to grab onto the ice and heave yourself forward.
4. Let clothing drain – Once you’ve climbed onto the firm ice, let your clothes drain a few seconds before proceeding to the next step. Wait too long, and you might freeze on the spot. Roll away from the edge of the ice. Do not attempt to get up right away.
5. Crawl back to safety – Once you have safely rolled away beyond the weakened edge of the ice, continue to crawl back along the route you were on when you fell in. Don’t try to stand and walk until you are a safe distance from the open water.
In a worst-case scenario where you cannot climb back out and are close to losing consciousness, getting your arms out onto the surface of the ice might freeze your sleeves to the ice thereby securing you to the surface instead of slipping back under water – and easier for eventual rescue (or recovery).
Walking On Ice
Ice Traction Under Foot – Ice Cleats and Crampons…
Traveling on foot, whether a few paces around the ice fishing hole, or trekking across a wind-swept, glass-smooth frozen lake, can be quite the balancing act sometimes. Those who purposefully step out onto the ice as part of their outdoor recreation fix, have at one time or another found out just how bone-shattering, hip-slamming hard solid ice can be. Yet, for all its slip-sliddin’ challenges, walking on ice can open a whole new door of exploration and enjoyment of the outdoors with proper ice traction under foot.
Mention winter foot travel and snowshoeing or cross-country skiing naturally come to mine. Both, of course, require snow. Often, the very cold winters that turn rivers, lakes and marshes into thick, slick expanses of ice, do not always produce a white mantle cover as well. Even with repeated snowfalls, patches of wind-swept, cleared ice can form within the snowy layers along a route, especially when crossing a larger body of frozen water.
From a self-reliance standpoint, fatigue can often lead to slow or weakened response to critical situations. Basically the more exhausted, worn-out you are, the more likely you might let your guard down. Concentrating on walking on dangerously slick ice is like inching along a lofty tightrope without a net – and it can sap energy from you. Using traction aids for maneuvering across ice, not only reduces your risk of a bruising fall, it requires less mental and physical stress and energy thereby saving and stretching your stamina reserves.
When encountering long stretches of exposed ice you have the option of continuing along on that hard, bare surface or remove your snowshoes/skis and step-slide gingerly across the surface. If, however, you’ve thought ahead, you can switch to some sort of traction soles and continue on. With one of several of the ice traction aids made to attach to your footwear, a whole new aspect of winter walking lets you enjoy the ice right from that first slick-surfaced step.
Snowshoes – Snowshoe traction aids (crampons, cleats) make for loud, grating walking on bare ice and put pressure on the crampon/cleat over the long, continuous and hard-surfaced trek over ice. More practical snowshoeing involves carefully anticipating routes, finding alternate snow-covered corridors and carrying easy-to-slip-on traction soles that fits the particular snowshoe boots you are wearing.

Traditional wood-framed shoes can also be fitted with two types of traction grippers: a bridge-like bar of “teeth” or individual, circular cleats that look like vicious bottle caps. Either can be affixed directly to the underside of the frame across the toe bar (right beneath where the ball of your foot would step). Cleats/crampons on snowshoes work well to keep your wood or metal/composite frames from skidding with each foot step while walking along the ice surface.
One environment where cleated or crampon snowshoes work well is on icy slopes and inclines where varying temperatures (typically in later winter/early spring on south-facing slopes at higher elevations) create changing surface conditions due to thawing snow crusts re-freezing as broad sheets of glare ice. Thinner crusts will collapse providing more solid foot for the snowshoe in the softer snow below.
A heavier crust can be managed with the biting grip of cleats on a wooden-framed shoe or with the mountaineering-like crampon claws used with modern metal/composite-framed snowshoes. On modern style frames, the crampon claws are affixed below both the toe cross bar and the heel area of each shoe.
 For slope trekking, a proper-fitted snowshoe enables the wearer to pivot the toe of the
boot down through the toe hole in the deck of the snowshoe and dig into the surface. A heel riser bar on some backcountry models lets the foot align better to offset the angle of the slope for better positioning of your ankle/foot against the angle of the snowshoe’s orientation.
Traction Soles – Whether you are checking several ice fishing rigs or walking the reeds along a frozen lake, secure traction underfoot is critical for safety and satisfaction. If you are a paddler, being able to walk along a frozen water corridor that was either too shallow or cluttered to allow passage during summer is yet another often-missed opportunity that an ice traction sole makes possible. Walking along the shore of a reed-lined bank might require way too much bushwacking for a winter walk. A few more steps out onto the ice, and the pathways to roam are as broad as the icy expanse before you.
Traction soles are available in three basic options, all utilizing either straps to fit around/over a boot sole, or a second, full-sized sole covering the entire bottom of your footwear like the double sole that it is.

Some ice traction soles are merely studded rubber pads attached to straps that align those studs over the ball and heel of your boot held in place with elastic straps pulled up and over your boot like you would put on an anklet stocking. Traction is typically provided by a hardened metal, rivet-like stud imbedded in the sole pads.
Other slip-on traction devices use wire coils or hardened cleated bead-like studs along a chain network (like tire chains for a car). These are slipped onto your footwear and secured with stretchable rubber toe and heel-grabbing loops.
The third type are a full-soled platform quite literally looking like a slab cut from an actual studded snow tire. Thick, sole-shaped platforms have a pattern of studded cleats installed throughout the entire surface, from toe to instep to heel to provide ultimate gripping, biting power. Short of being a full, claw-grabbing ice crampon, these heavy-duty cleated soles will have you dancing across the slickest ice as those you were wearing sneakers on a tennis court.
Some lighter units may not hold up as well as the stouter models, but will be easier to fold up and carry along in your pocket or stowed in the glove compartment of your vehicle. The heavier-made ice traction straps and soles can greatly increase you range of activities on ice throughout winter.
Walking on river ice is perhaps the most dangerous of all your options, but remember, no ice is every 100% safe, no matter where it is. Stick to frozen lakes, ponds and shallow backwaters while still maintaining a high level of caution.
Be Safe; Be Smart; Have Fun!

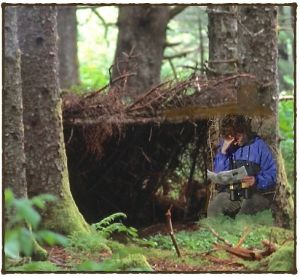
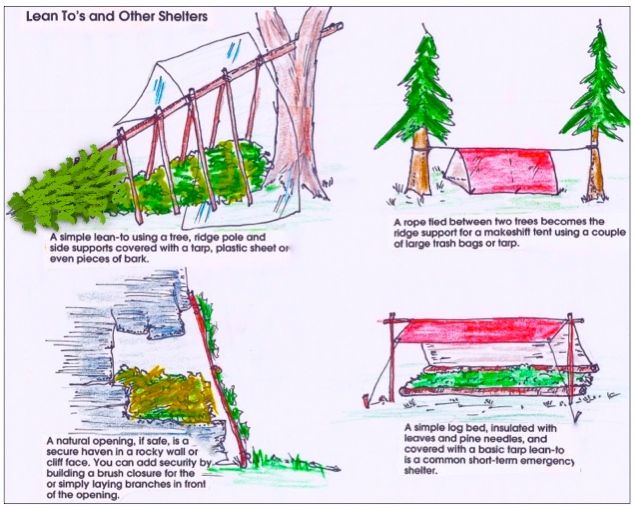
Basic Shelter Construction
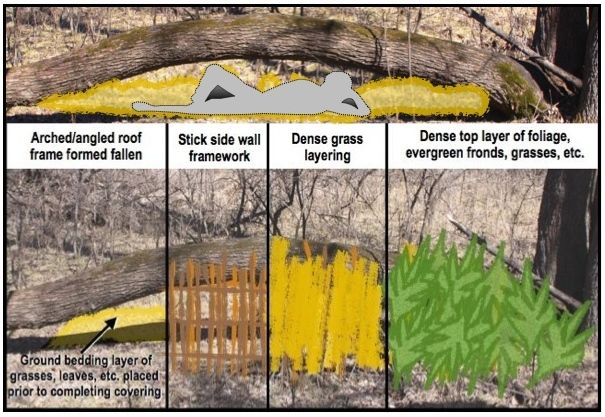
Whatever situations arise that requires the construction of an emergency shelter, the most basic structures don’t require knots, knives or even hardly any know-how. Using natural forms, or modifications thereof, you can build an adequate shelter to protect you, at least partially, from the elements.
One of the biggest threats to our lives outdoors is hypothermia. If we can’t keep dry and warm, our body loses too much heat and we die! A shelter, even one that doesn’t fully block out elements such as rain, snow, wind, etc., will at least prolong your chances for survival and rescue. In such situations, you need to construct a shelter fast, and you may not have many tools or know-how (for knots, etc.) to make a sound structure – one that let’s in too much of the outside and/or won’t collapse at the height of the storm.
Basically a shelter needs three components to provide proper protection: a roof or upper support structure, element-blocking side walls and, ideally, ample insulation for bedding and surrounding heat retention.
Roofs can be overhanging rocky ledges or more commonly, either a bend-over/arched tree. Equally effective is a long roof pole braced into the “vee” of a forked tree or even laid against a large side branch. All of these for the basic “roof line” support for your side walls.
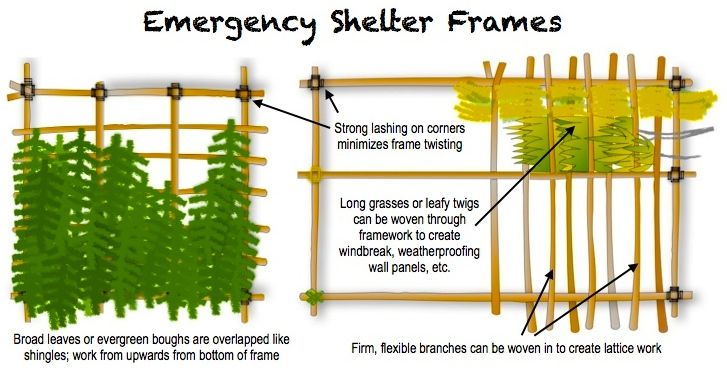
Those walls can be made out of sticks/branches laid at an angle vertically to the roof beam. You can sharpen the ends and jam them into the ground for some security as you angle the tops against the roofline. The more secure this frame is, the more options you’ll have to cover your shelter more securely. Even a little rope/twine can secure a few sidewall sticks to the roof frame to provide stronger support to enable you to weave cross members in at right angles and provide additional frame structure for adding other coverings.
The next step should be to pile up leaves, grasses, etc. against the framework to create an insulating layer. Of course, the tighter the spacing of the base wall frame the easier to cover or stuff it with insulating material. Prior to covering the outside of your shelter, this same material can be used to loosely stuff the interior of the structure, too. Think about creating a nice, warm, cozy, insulating “nest” inside.
Lastly, leafy branches, pine/spruce fronds, long strips of bark – anything that will cover a broad area can serve as your “shingle”, your outer roof material. Again, you should be able to find a variety of natural materials to do the job – no knots, no knives.
There are no style points in emergencies so use whatever works.
Obviously honing your skills with a knife, learning knots and how/when to use them and other know-how can all help you create a solid, lasting shelter. Keeping the basic concepts in mind and using the most minimal of gear – or skills – may just save your life.
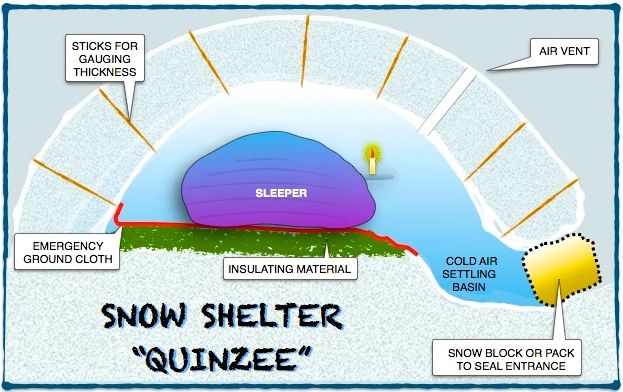
Snow Shelter – Profile of a Quinzee
Friction Fire Starting – Throwing a Spark
Starting a fire, without a match or lighter in an emergency situation, is a critical major step in most every survival narrative. While “rubbing two sticks together” is the ultimate approach at the pinnacle of self-reliant resourcefulness – and showmanship – throwing a spark is a more effective, yet equally impressive way to start a fire.
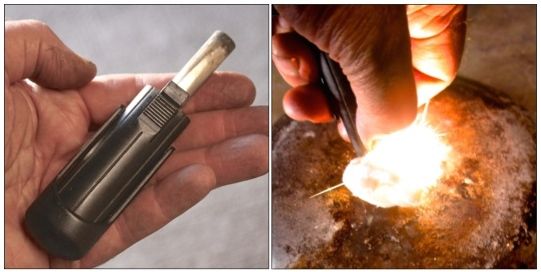
“Throwing a spark”, as it implies, simply means creating and directing a hot spark onto burnable tinder for quick ignition. Flint-and-Steel (F/S) are the traditional tools for generating that spark, a method basically unchanged since relying upon flint and stones back in our caves.
Today’s flint and steel kits come in a combination of styles. Coupled with advances in tinder (the quick-catching burnable material that ignites when the spark hits it), starting a fire is literally as easy as ‘flicking your Bic’ once you learn the process.
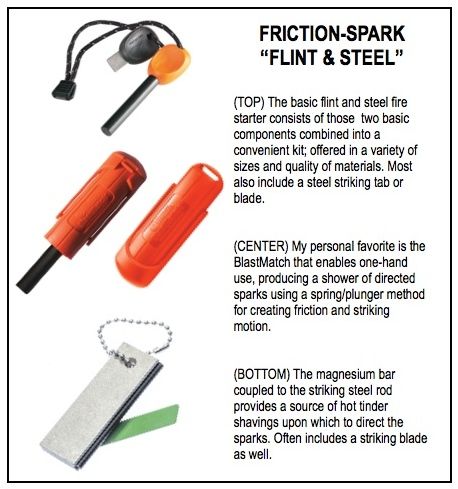
Regardless of the design, all F/S tools are a combination of a spark-producing rod (flint) and a striker blade (steel) that are literally used against each other to create a spark from friction applied along the rod by that blade (knife, section of hacksaw blade or other).
The “flint” is actually ferrocerium, a synthetic pyrophoric alloy that produces hot sparks capable of reaching temperatures of over 5,000°F when rapidly oxidized in the striking process. Most kits couple the two critical components together for easy carry on a key chain or pocket knife lanyard.
With just a little practice, most anyone can become proficient at starting a fire using these kits. Most do require two hand use (an injured, unusable hand is a serious liability in any emergency).
For that reason and the fact that I’ve always been able to start a fire very quickly with this particular kit, I personally prefer a “Blast Match” fire starter unit. It’s one-hand operation utilizes a spring/plunger mechanism to produce friction while scraping the steel down the length of flint, directing a concentrated shower flow of sparks onto your tinder.
It does require a hard/firm surface to push against. However, while you don’t need a hard surface against which to brace common F/S kits, concentrated and directional force is easier to maintain when you do have a firm base.
Chips of magnesium easily catch fire when a spark is introduced to a pile of the shaved, soft metal. These hybrid kits imbed the steel striker rod onto the side of a small magnesium bar. Chips of magnesium can be shaved off and ignited with a spark making this an efficient and effective fire starting tool.
Creating and controlling the spark from a kit is only half the fire-starting process. The sparks bursting forth from the rod when scrapped with a knife or other sharp steel edge must come immediately into direct contact with a combustible material (your tinder for the fire) while they are still extremely hot as they cool as quickly as they are generated. Because the spark is a very finite point of heat, the exposed the ignitable surface is, the better chance at “catching” on a tiny surface of tinder and igniting into flame.
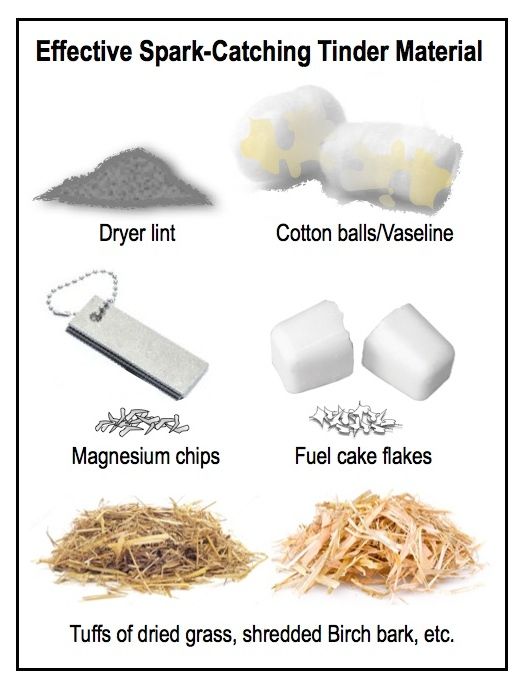
The most common and effective spark-catching starter ‘tinder’ is cotton – typically in the form of a common cotton ball. These fibers will burst into flames with very few sparks – and burn rather quickly. Vaseline/petroleum jelly rubbed into the fibers prolongs the cotton’s burn time – like an oil lamp where the jelly is the fuel and the cotton is the wick. The key to this method is fluffing up tuffs of fiber for more surface exposure for the sparks to come in contact with the ‘fuel’.
Lint from a clothes dryer bursts into flames as fast or even faster than cotton. It burns quickly and, depending upon the ratio of synthetic fibers to natural cotton, will also partially melt as it burns. Both methods can be used very effectively as starter flames for igniting bigger, long-lasting fires.
As mentioned earlier, chips of magnesium off the fire-starter bar ignite quickly for an incredibly hot flame. It doesn’t last long, but practice and a good pile of starter tinder will produce a fire quickly.
Polymer-based fuel cakes (they look like tiny bars of white soap) are easily flaked and piled for quick spark starting fires. Some F/S kits have a compartment for stowing a portion of a fuel cake or other spark-catching tinder. Some forms of this type of fuel cake can actually be lit while floating on the water. Long periods of storage or prolonged exposure to the elements can cause them to gradually deteriorate and become less effective.
There’s always natural tinder, too: dried grass, wood shavings, and the classic: shredded birch bark. With the exception of birch which contains oils, natural tinder needs to be bone dry to be most effective.
A good outdoorsman/women knows that practice makes perfect. This is never more important than when learning to start fires by the flint-and-steel method. Get used to carrying a F/S kit with you everywhere, all the time. Secondly, when outdoors and where practical, gather what you think would make good, spark-catching tinder and try igniting it (use a manageable flat rock for a work surface) and start tracking mentally which materials work best. Never wait until the emergency to first attempt a self-reliant skill.
. . .
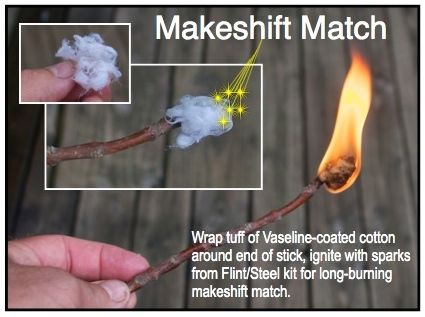
Creating a Long Match from a piece of cotton ball secured to the end of a twig can help you bring the flame to your tinder, or wick, or whatever…It’s important to fluff up the oil-coated cotton to create multiple, fibrous fragments that the sparks can come in contact with and ignite.
Pack as many lighters and buy as many storm/emergency matches you can carry but also take the time to learn how to start a fire using flint and steel, it’s not only a fun skill to show-off to friends, it might just be a life-saver when you need it.
Food as Fire Fuel
“Torching your gorp” to light your campfire...
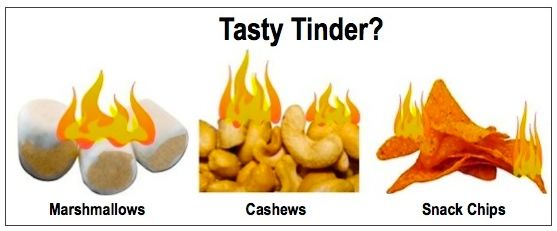 While I initially considered it more of a parlor trick, using a snack chip or other food for an emergency fire lighting tool does have merit. My bias toward this topic being duly exposed, let me offer some positive points on the aspects of this “survival” technique.
The main difference between a burning Dorito™ and a stone oil lamp is that the oil lamp tastes slightly more gritty—and is much harder to chew! Basically any food that will ignite and draw fuel from the cooking oils it holds could probably be ignited, at least with a match.
Question is, why would you want to waste a few snack chips, cashews, or whatever other combustible munchie? Or, more importantly, a valuable resource such as a match or limited lighter fluid as a means of starting a fire? To his credit, one expert on an outdoor self-reliant website who conducted tests with various food items as tinder admitted that it had taken him at least 45 seconds to set a single cashew ablaze. That’s a lot of matches or lighter fluid! And, although I haven’t tried it, I’m pretty sure that such tinder is not combustible enough to ignite from a shower of sparks either.
My biggest question to those who profess this skill as critical, or even marginally useful is …what are you using to actually fuel your fire? What is your foundation of tinder; your kindling; and ultimately your long-burning fuel? Obviously there’s not enough wood or other material at hand to readily or directly ignite, or you wouldn’t be trying to torch your gorp. So what fuel are you going to be using to maintain your fire? You apparently don’t have any wood to shave into a feather/fuzz stick; and are all your other fuel options so wet you can’t even split or tear any apart to find dry fibers inside?
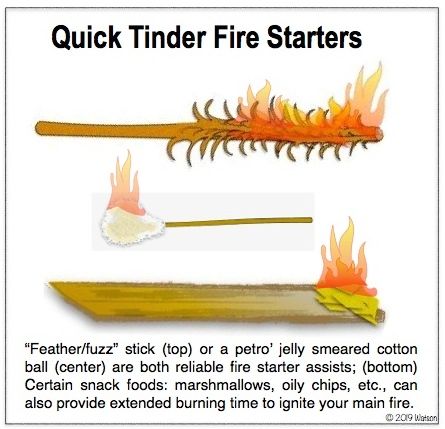
All that said, if matches were scarce and tinder was limited, perhaps the extended life of a food-fueled flame would buy you some ignition time to get the embers glowing. Tongues of blue-green flames lapping the air around a burning marshmallow could easily be shoved into the center of your tinder pile to trigger the inferno. This is not all that far removed from using a cotton ball swathed in petro’ jelly (or smeared with butter or cooking oil if we are staying in the food mode here) as an emergency fire starter. Likewise, a few greasy corn chips might buy you a broader, longer burn time than could a single match, or without emptying the fuel reserve from your BIC®.
It would be an interesting exercise to check out a variety of alternative tinder/food fuel sources. Select several likely “food snack tinder” samples and test each one for ease and speed of ignition, length of burn, etc. Maybe you will find one that would actually augment the use of a match in time of need, and serve a dual purpose as a tasty treat. While you are at it, see for yourself how easy or difficult it may be to light any of these alternative tinder sources with a spark from a flint/steel kit.
All that said, I must admit I’d rather depend upon a corn chip to light a fire than have to chomp on a self-lighting briquet for a snack. Bon Feu, mon ami!
I’ve found the BLASTMATCH to be the best, and one-hand-use- flint/steel
fire starter out there!
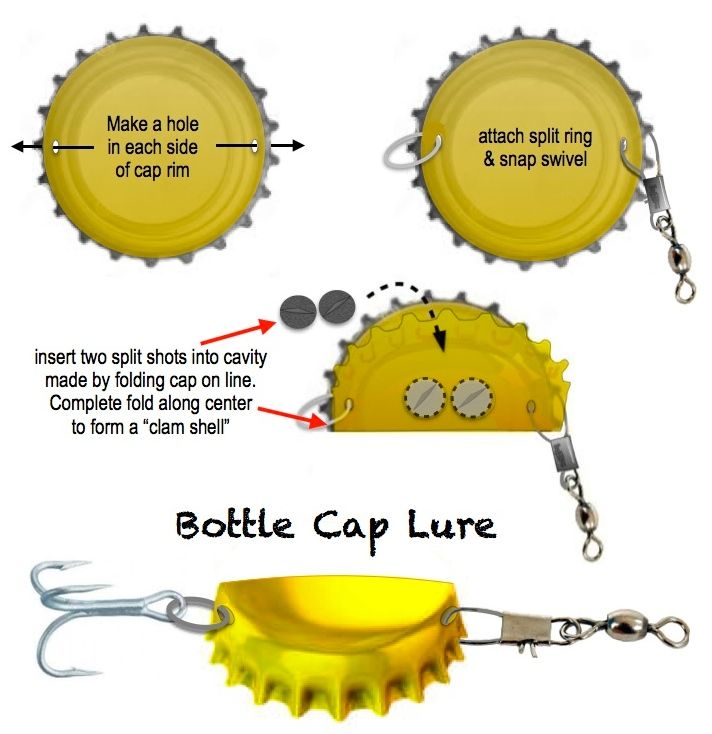
Making Emergency Fishing Lures
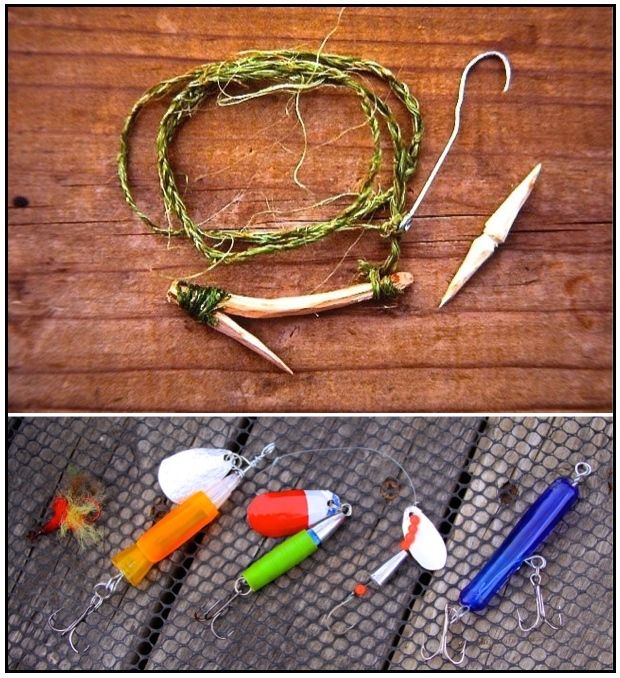
Fish, and many amphibians and reptiles are probably one of the best, and easiest protein food sources to harvest in an emergency situation. They are plentiful in a variety of environments, and oftentimes require the least amount of energy to catch.

Lines can be created from stout sections of fiber, dental floss or even braided from natural plant fibers such as stinging nettles. While many are crude, they can reward the patient survivalist with at least life-sustaining nourishment.
Making an emergency fishing fly …
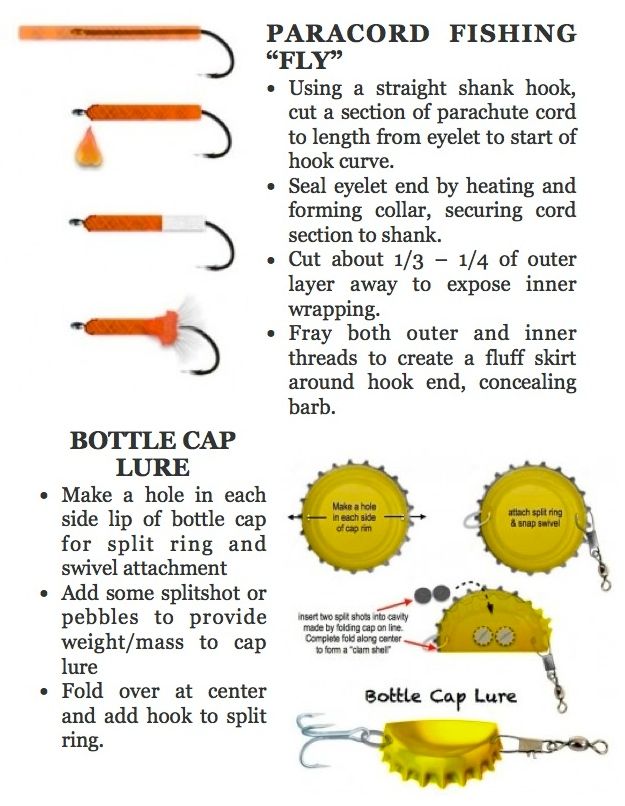
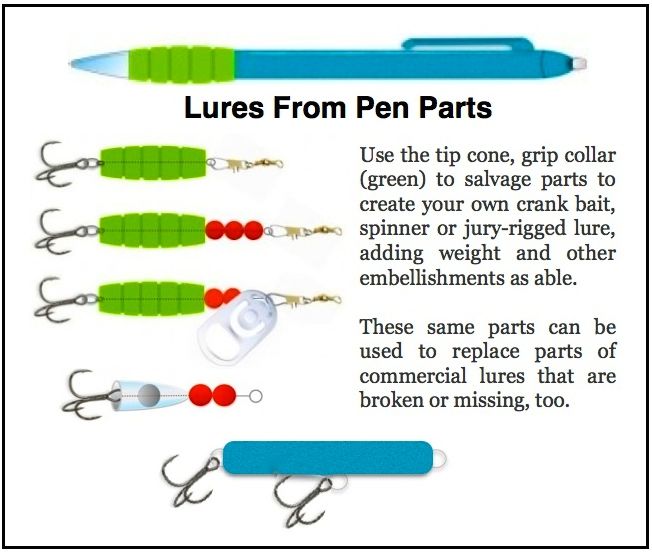
Besides line, hooks can be fashioned from sticks, bone, thorns and a variety of metal scavenged from soda cans or other fragments from your inventory of gathered resources. So,too, can you fashion various lures, spinners, flashers and the like with similar materials.
Likewise, bait can often be found – and in many cases be eaten themselves, especially in dire situations or where fishing just doesn’t appear to be a successful option.
 Always carry a multi-tool with you, they are indispensable for fabricating myriad survival implements.
Never dismiss anything as a possible resource in an emergency/survival situation.
![]()
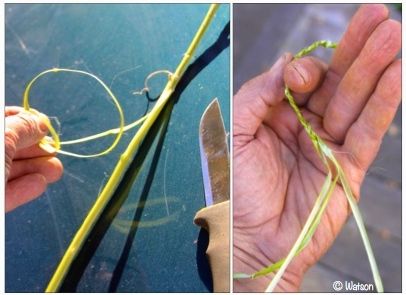
Emergency Roping/Braided Natural Fibers
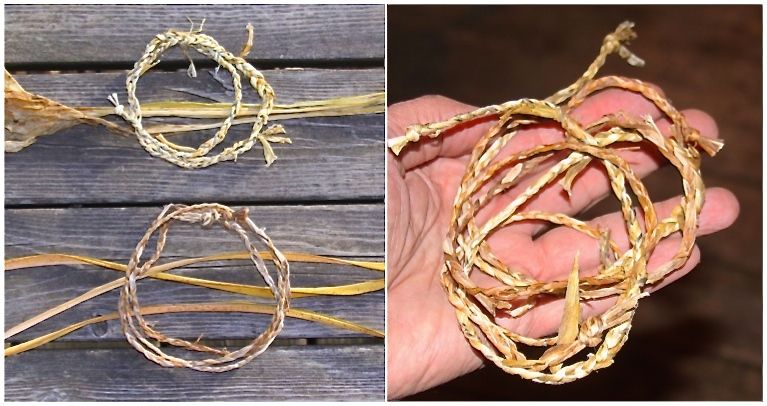
The best classroom for learning and honing your self-reliance skill can be in your own backyard or near by picnic area/campground. Many of the same or similar resources you’d have to rely upon in the backcountry can be found within the urban environment.
In the photo above, leaves and stems from common hosta plants (top) and dried iris fronds (bottom) were easily braided into tough, yet flexible, cordage/roping that could be used for lashing/binding, perhaps even fishing (smaller, finer plant fibers would be my first choice for fishing line).
By overlapping the ends of braiding fibers, you can use short 12″-15″ strand to create cordage several yards long. I was able to create about eight feet of beetle-fiber braided line in about 20 minutes – from peeling long fibers from the crushed stem of plants to interweaving joining lines to the finished, braided cordage.
Such emergency roping has a short work life as it dries and deteriorates after a few days.
![]()
Ground-To-Air Signal Size Ratio
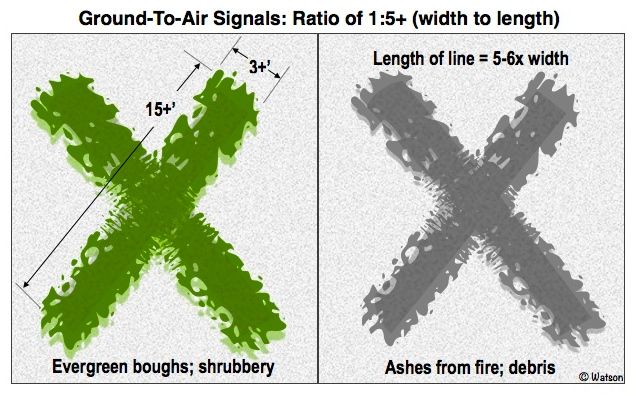
Because the size of something on the ground appears to be smaller when viewed from the air – what looks like a beach covered in pebbles may actually be covered in rocks the size of walnuts; what look like fist-size rocks are probably as large as melons, and so on.
When it comes to making signals on the ground – drawing in the snow or sand or making hedgerow-like lines with brush and evergreen branches – size is critical for being seen from moving, low-flying aircraft.
Using the standard “X” as a classic emergency ground signal as our example, realize that each arm should be at least five times longer than it is wide and subsequently based on the width of each arm or sections being at least three feet width. The ratio of 5:1 is the minimum dimensions for any type of ground sign. An “X” with three-foot-wide strokes should therefore extend at least 15 feet along the ground.
As with any signal, it’s important that the color of your signal be in sharp contrast to its background: dark foliage or campfire ash against snow; light colored material against dark sand or ground cover.
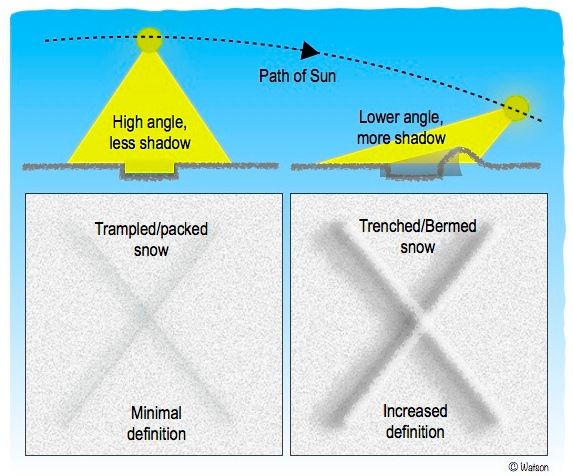
If you are packing down snow or digging a trench, know that shadows can play a roll in the visibility of your sign. At higher noon angles, the sun may shine directly down on the signal negating any shadows that provide contrast. Sunlight from more of an acute angle (or a signal oriented East-West instead of N-S) will cast a shadow from sunrise to sunset in most situations.
How To Make A Signal Fire
Creating signals is a basic step in emergency situations. Fire and smoke are two effective visuals used to draw attention to your location. Sometimes circumstances may force you to create hastily built fires for immediate use. When time permits (and as a way to put your mind at ease) constructing more intricate and perhaps effective fire/smoke signals may ultimately make your rescue come that much sooner.
A group of three visuals, purposefully placed, is usually recognized internationally as a signal for help. Hunters know, too, that three quick, but sequenced gunshots is the audio equivalent of three bright fires or dense columns of smoke, as an emergency sign. For backwoods emergencies, creating three signal fires is an early step in working towards your rescue.
Obviously, these fires need to be burning in an area where they can be seen from above and from distances on the ground. Higher is usually better, as is being positioned in openings with long lines of sight and clear views of the sky in all directions. Once that location is found, it’s important to clear away an area on the ground in which the three fires will be built.
Equally critical to starting the fire, is fuel to keep it going. Piling up various sizes of fuel (from kindling to branches) assures you that your fire won’t just quickly flash, and then die. It is important, however, that the fuel is of appropriate size and dryness to be able to ignite quickly.
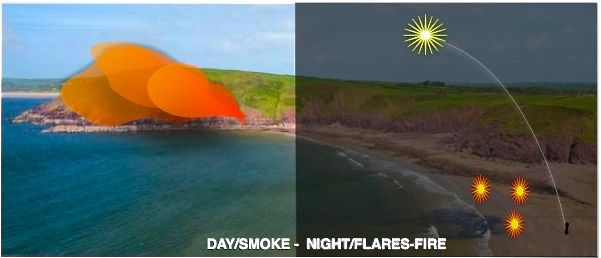
By day you want to produce volumes of thick, quick-rising smoke that stands out starkly against the background (white smoke against the dark greens of a coniferous forest, for example; black smoke against a snowy backdrop). You are not trying to build up a nice set of coals for dinner, you are hoping for either bright, radiant tongues of fire that quickly reaches skyward, or bellowing clouds of high-visible smoke – both of which bombard the sky with: “HERE I AM!”
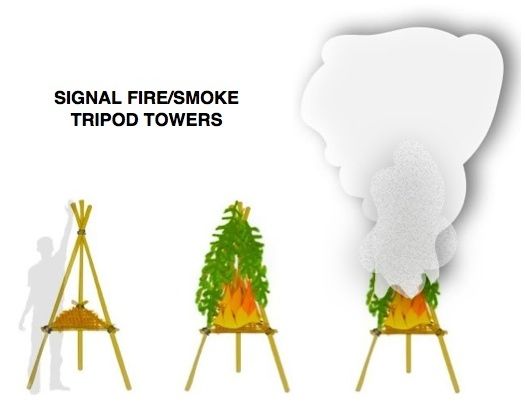 A good style of signal fire is a Tripod Tower structure that enables you to build a fire up off the ground and create a framework that allows for a taller, if not bigger fire. It’s perhaps most effective for creating smoke. Foliage can be draped over the frame, onto which a platform within the support poles has been built. Your starter fire is built upon this platform. The overhanging foliage helps keep the fire material dry as well as keeping rain/snow out. It’s then there to serve as a good smoke-producing fuel.
If you’ve ever seen those home fire safety videos that show a Christmas tree flash fire, you can appreciate the effectiveness of using bone dry and brittle evergreens as a signal fire fuel source. Dead, but full shaped and densely branched evergreen species can be cut and propped up as single, upright flame-producing signals.
 Larger branches or a cluster of more spindly-shaped dead conifers can be stacked like corn stalks to produce a similar effect. Even a well-constructed pile of smaller branches will create that almost instant flash of leaping light for your signal fire. With any of these options, placing a quick-ignite tinder pile at the base of the dead limbs gives you a head start in igniting the structure from the bottom.
Besides the practical emergency necessity of a good signal fire arrangement comes the psychological benefit of keeping your positive mental attitude focused on building these essential survival signals.
The key to any signal is being in contrast to its background: motion vs stillness; light vs dark; pattern vs randomness.
![]()
Emergency Signal Pyrotechnics
By general definition, a visual distress signal can be anything that draws attention to your location in an emergency. To be most effective, it obviously has to be highly visible for a reasonable amount of time, and from an observable distance, most typically from searchers from above. In the case of paddlers, it needs to be seen across expanses of water as well.Basically such signaling devices are of two types: 1) pyrotechnical; and 2) everything else!
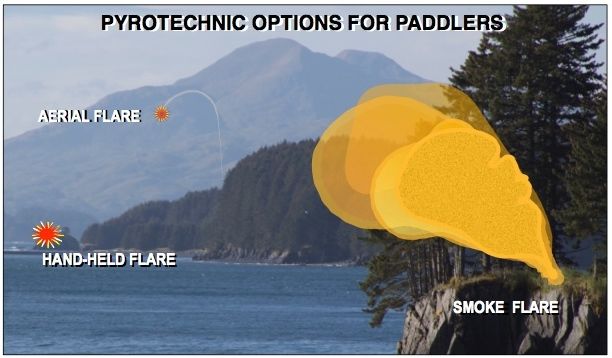
Pyro(“fire”)technics, by common definition are – fireworks! In the context of emergency signaling, pyrotechnics are represented by three categories of devices: aerial/meteor flares, ground flares and smoke.
Both the U.S. Coast Guard and the International Maritime Organization (IMO) have pyrotechnic standards for luminosity and have regulations based upon their own rating system. The IMO regs are more commonly known as Safety of Life at Sea – or SOLAS. Typically the USCG-approved devices are much cheaper (and often less effective and dependable) and probably more commonly used by recreational boaters.
All pyrotechnics are designed to enable you to complete two vital tasks: 1) signal that you are in distress, an emergency situation; and 2) visually lead responders to your location. A practical rule for using pyrotechnics is to not initiate them until you can actually see the approaching rescuers. There are exceptions to this rule, but the intent is to use them only when there’s the most likelihood they’ll be seen!
Flares have different burning times, altitude ranges and intensities (measured in “candela”units, a term that replaces “candlepower” – one candela is roughly equal to the amount of light produced by one candle).
Here’s an overview of each type:
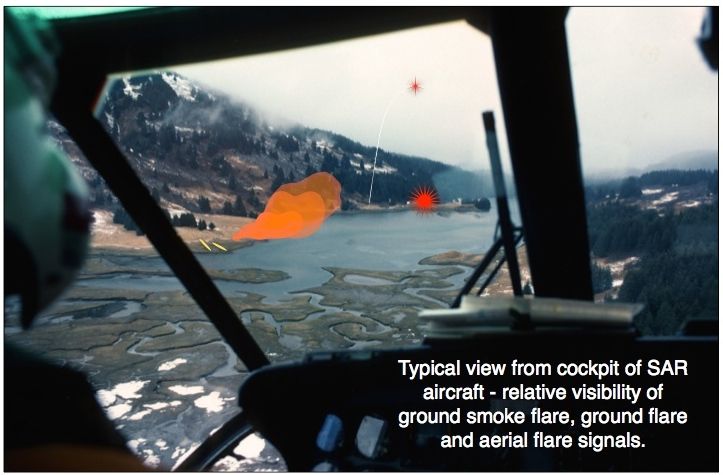
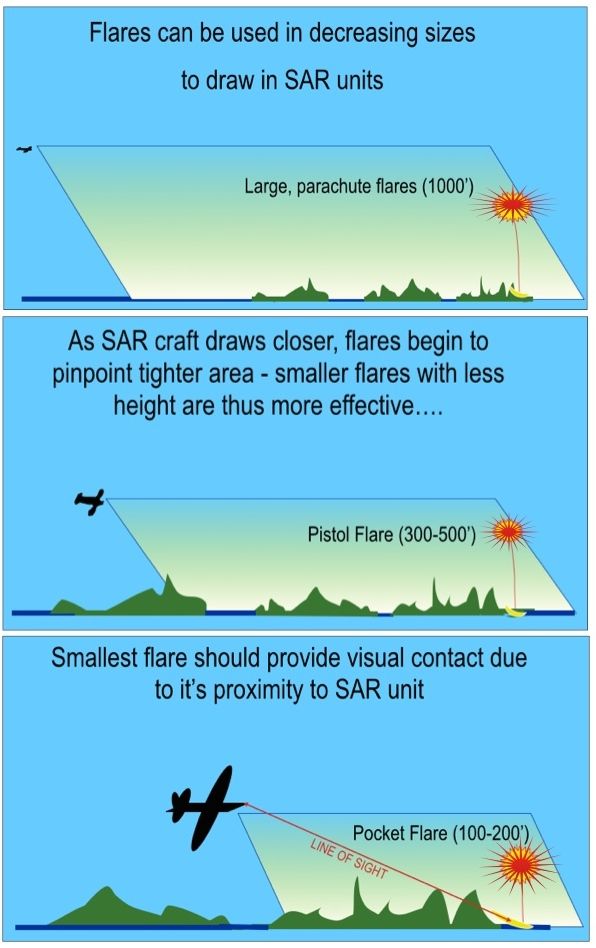
Aerial/Meteor Flares – Think 4th of July bottle rockets or a bright, blossoming burst of light overhead. Many paddlers may use the popular “pocket flare” kits that provide short/low range, hand-launched aerial flares that can be kept handy in one’s PFD/Life Jacket. There are also larger versions including higher altitude-attaining parachute flares. Aerial projecting flares come in a variety of sizes and are all considered “hand-held”. Height, intensity and burn time are the three critical factors for an effective aerial flare and should be clearly noted on the label. SOLAS parachute flares are designed to reach a height of 1,000’, burning 30,000 candela for at least 40 seconds.

Historically, the less expensive, smaller pocket flares had a poor ignition rate; it was common for at least one flare in a new 3-pac to be a dud! In fact, an early kayak rescue video of the day included an on-water demonstration of a capsized paddler clinging to his boat and attempting to use the flares he had in his life jacket pocket. The first flare failed to ignite!
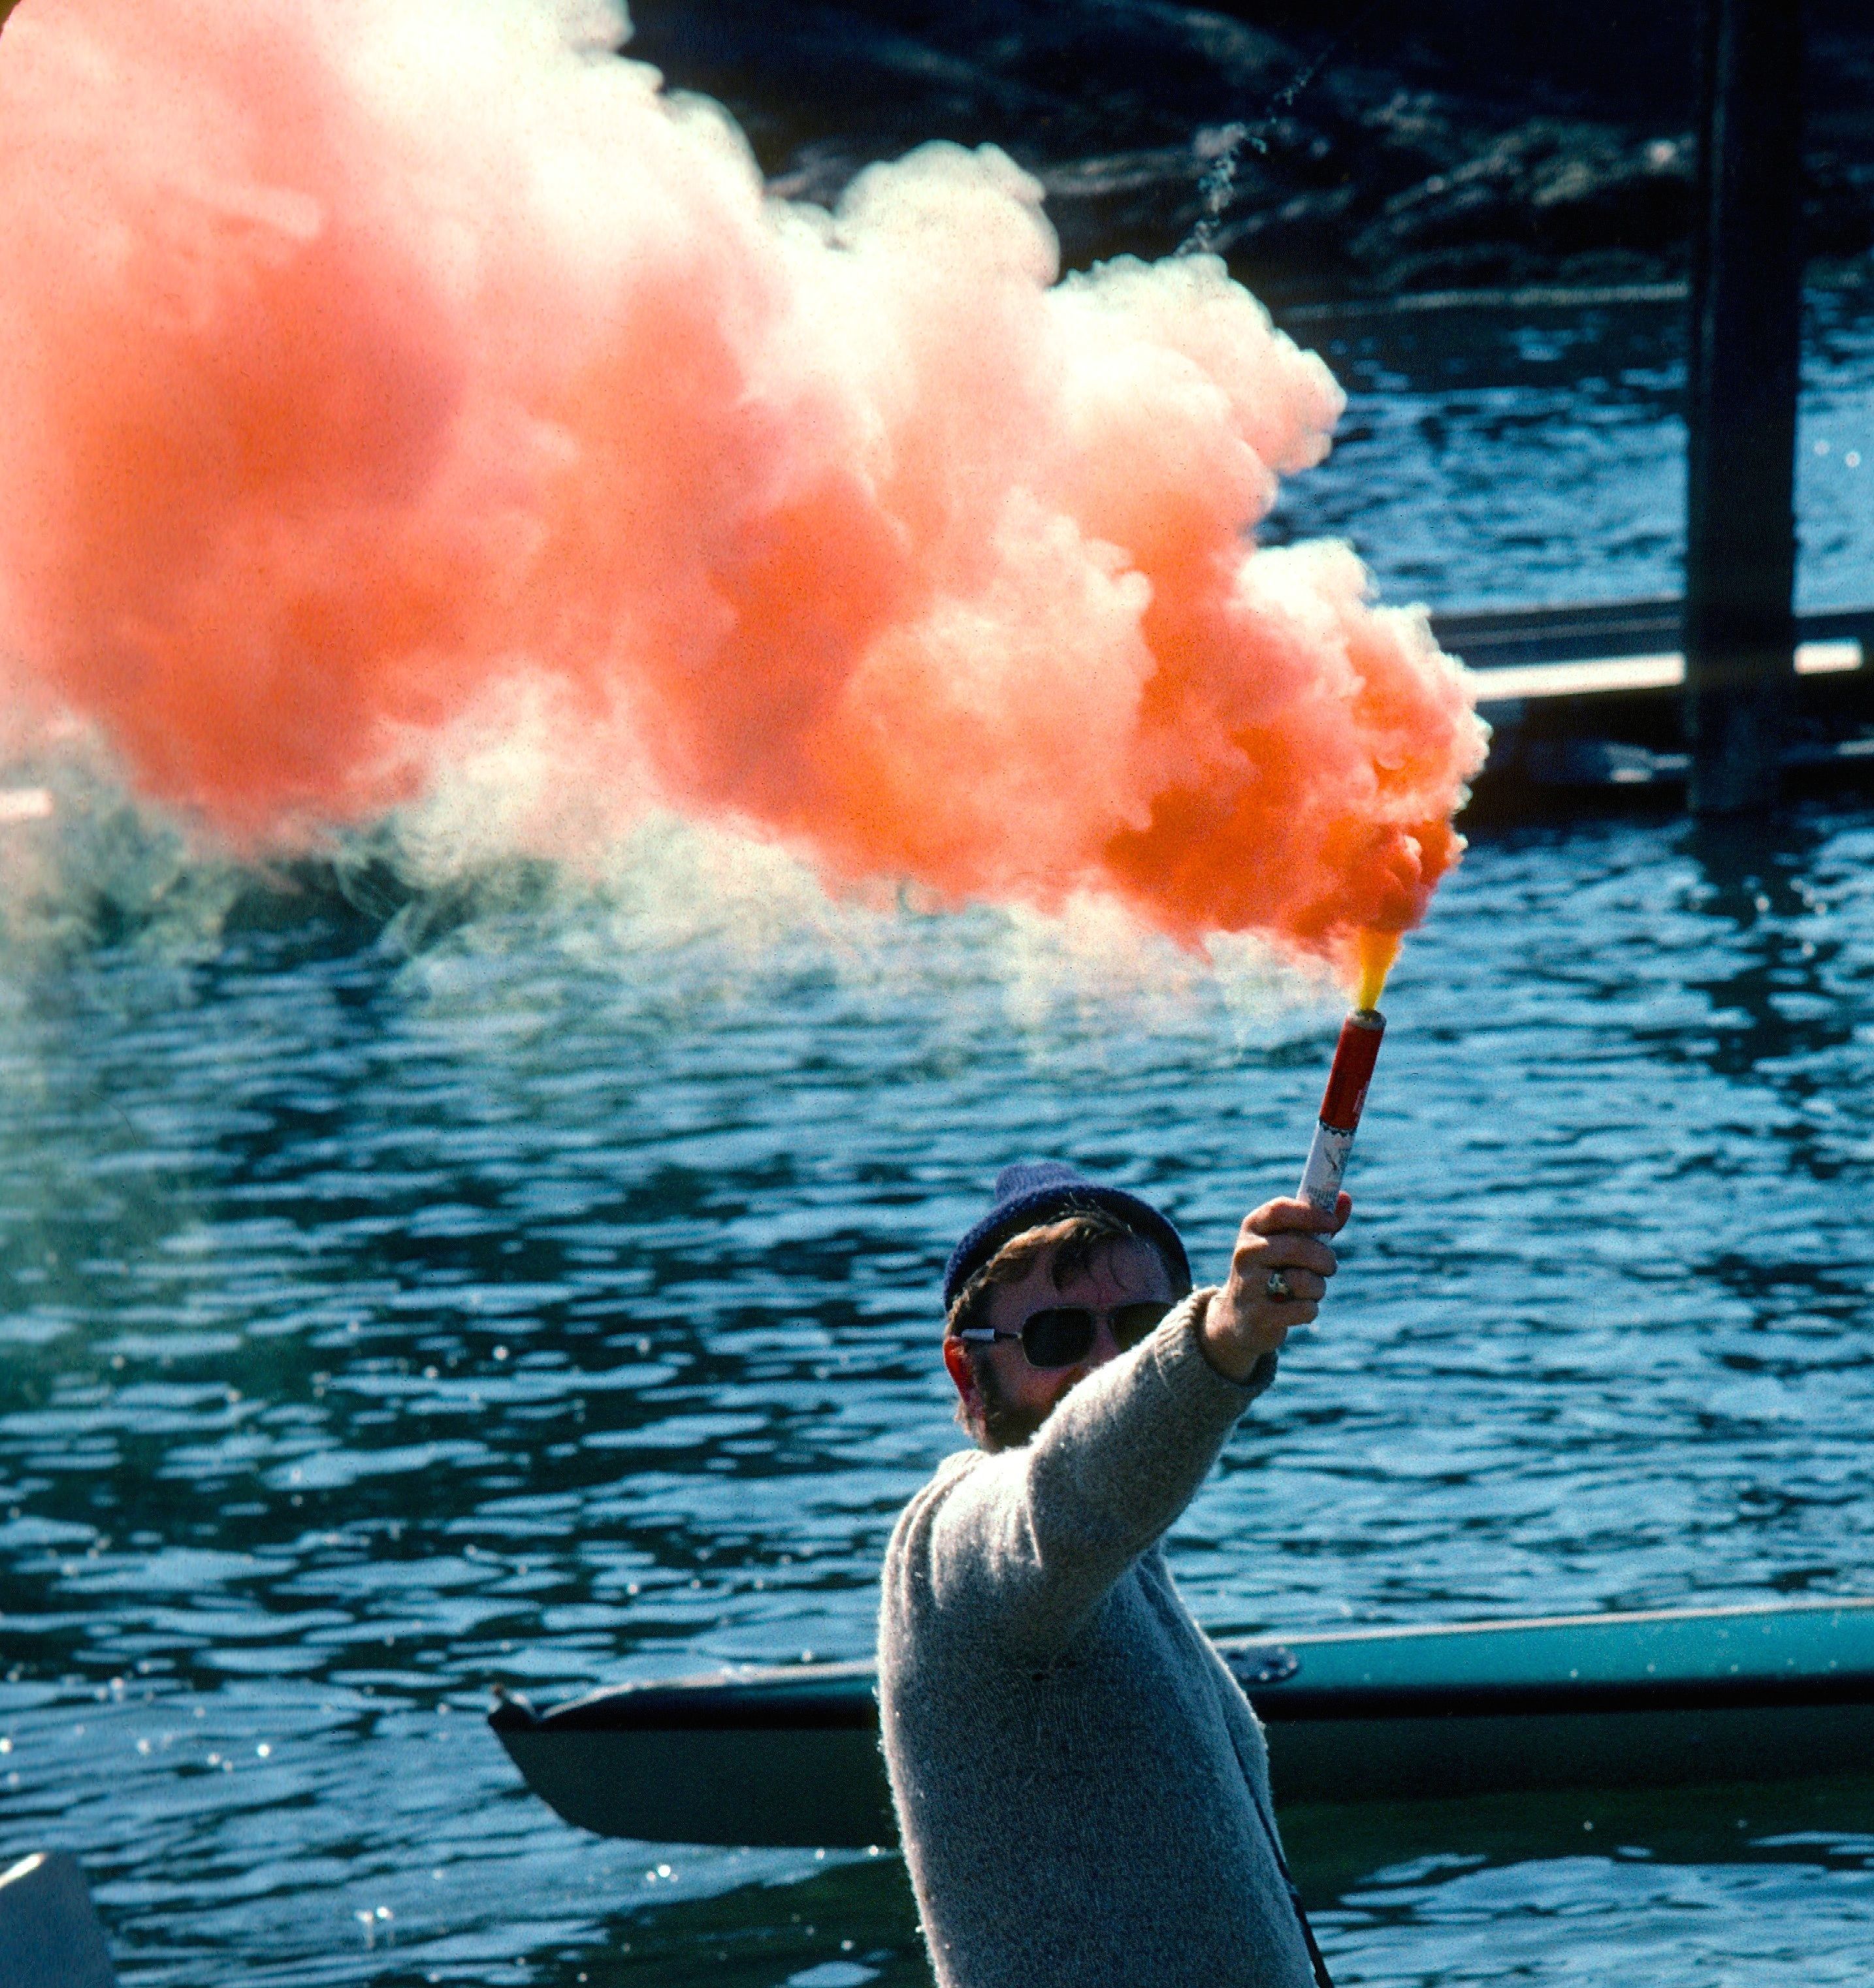
Hand-Held Flares – These are the type you see being held like a torch at arm’s length or tossed onto the beach. They are designed to burn with an intense red flame. They provide limited visibility from the ground or shoreline level. These typically burn at an intensity of 15,000 candela for approximately 50 seconds.
There are a few cautionary measures to take when using any hand-held pyrotechnic device. These things are messy! They burn, drip, sputter, smoke and sometimes explode! Not the kind of thing you want happening anywhere near your body or coming into contact with your canoe or kayak. Some projectile type devices also have a strong recoil – handle all pyrotechnics as you would a loaded firearm!
Prompted by their popularity, the USBOAT Foundation conducted tests on varieties of “approved” pyrotechnical devices – and despite their conforming to regulations, several cautionary discrepancies were revealed during on-water testing:
- lowest rated flares were “virtually” invisible; highest rated “only slightly more visible”;
- aerial flares were not very “attention-getting” in daytime (parachute flares were more visible);
Wind, vessel motion and launch angle all affected the height of the aerial flare.It’s also important to heed expiration dates – chemical components can deteriorate over time; moisture can affect performance. Old pyro’ may fail to ignite, or function at a much lower performance level when it comes to burn time, intensity, achievable heights and all the other characteristics of optimum capability. Expired pyro’ can still be kept for additional use, but not in lieu of required, current-dated devices as required.Handhelds offer a longer duration of attention-getting visibility, while aerial flares can be seen at a greater distance. Knowing how/when to utilize different types of signals plays a significant role in the search-phase of SAR missions.
While visual contact is the priority initiator of a signaling device, hearing an approaching aircraft (or water craft) might suggest firing the highest, longest visible signal possible. Searchers scanning a series of islands or a shoreline indented with myriad cuts and coves can be drawn closer to your location by using a high-altitude parachute flare. As the plane draws closer to a prticular section of the search area, another, perhaps lower-climbing flare can direct the search party even more precisely to a particular island or shore front.
The last step in this sequence, once you actually have the craft in sight ( and hopefully approaching you and not veering away), is to fire either a hand-held flare (day/night) or smoke canister (day) that lets rescuers zero in on you exact location.
If you paddle on coastal waters, the Great Lakes and it’s connecting waters, you must carry flares and distress signals in waters up to two miles wide. If your craft is under sixteen feet in length, you only need to carry such signaling devices between sunset and sunrise. Those devices can be either an electric light or three combination day-night red flares.
Having multiple pyro’ devices assures you of more options in such scenarios. Due to variations in performances, reliability and types of signals for day/night use, carrying at least twice the minimum amount makes sense. Cheaper units are less reliable, so weigh your options carefully.
One big limitation on knowing what pyrotechnics to use is that it is illegal to fire flares off outside an emergency situation and thereby not being able to judge their performance characteristics. The best way to observe this is through a controlled on-water demonstration. Check with a local or regional kayak expo’ or symposium to see if one can be arranged. You can also learn more about specs and other information on regulations and such through USCG and SOLAS websites.
Electronic devices, make-shift ground-to-air signals should compliment your skill inventory, and above all: Be safe, have fun out there!
![]()
Boiling Water Without a Pot – Hot Rocks!
There aren’t too many scenarios where a camper would not have a pot that could be used for heating water over a campfire or stove. However, Not having a pot to boil or at least heat up water is like being up a creek without a paddle — unless you are a resourceful outdoors person who knows how to sidestep such minor inconveniences. If you at least had a container of water (or some form of containment basin) there’s a way to bring boiling heat to it.
Rocks heated over a fire or gas flame (what, you have a stove but no pot?) can be placed into water where that heat is transfered to the water, eventually heating it to boiling. The challenge is to find rocks that won’t fracture and explode when dropped into the much colder water – sending chunks of sharp-edged rocks flying everywhere. Rocks that are porous or layered (shale) aren’t recommended. Better to use basalt or other tight, small-grain/crystal-structured rocks. Rock-solid granite may make fine monuments, but for heating water – forget it. It deteriorates too fast.
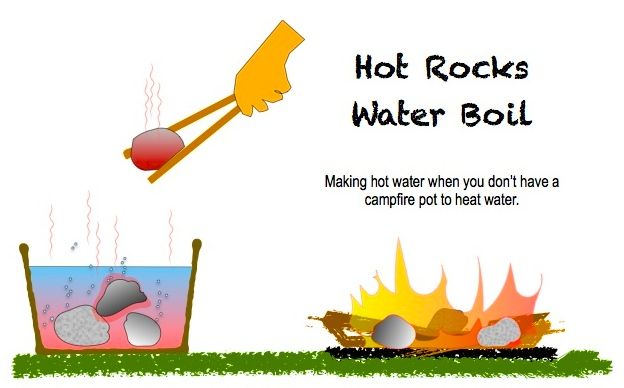
Once a container of water is set up, heat the rocks over a fire until a test rock steams when placed in the water vessel. Transfer the rock using tongs made from two tree branches (one of which should be forked to better craddle the hot rock between the tips).
Keep placing the rocks into the vessel until it starts to roil and boil on its own. The rocks will displace water so make sure your container can hold the additional volume. If you are going to consume the hot water, have another container handy to quickly rinse the hot rock of ashes and campfire debris before dropping into the main container. You can also tap rocks together to knock off specks and ash.
It may be a rare situation whereby you need to heat water and don’t have a pot or pan handy. Never say “never,” however; this is another good campsite skill to practice during a weekend outing.
![]()